
Struggling with weak WiFi in certain areas of your home? A whole-home WiFi system can fix this by providing consistent and strong coverage across every room. Here’s a quick overview of how to set it up:
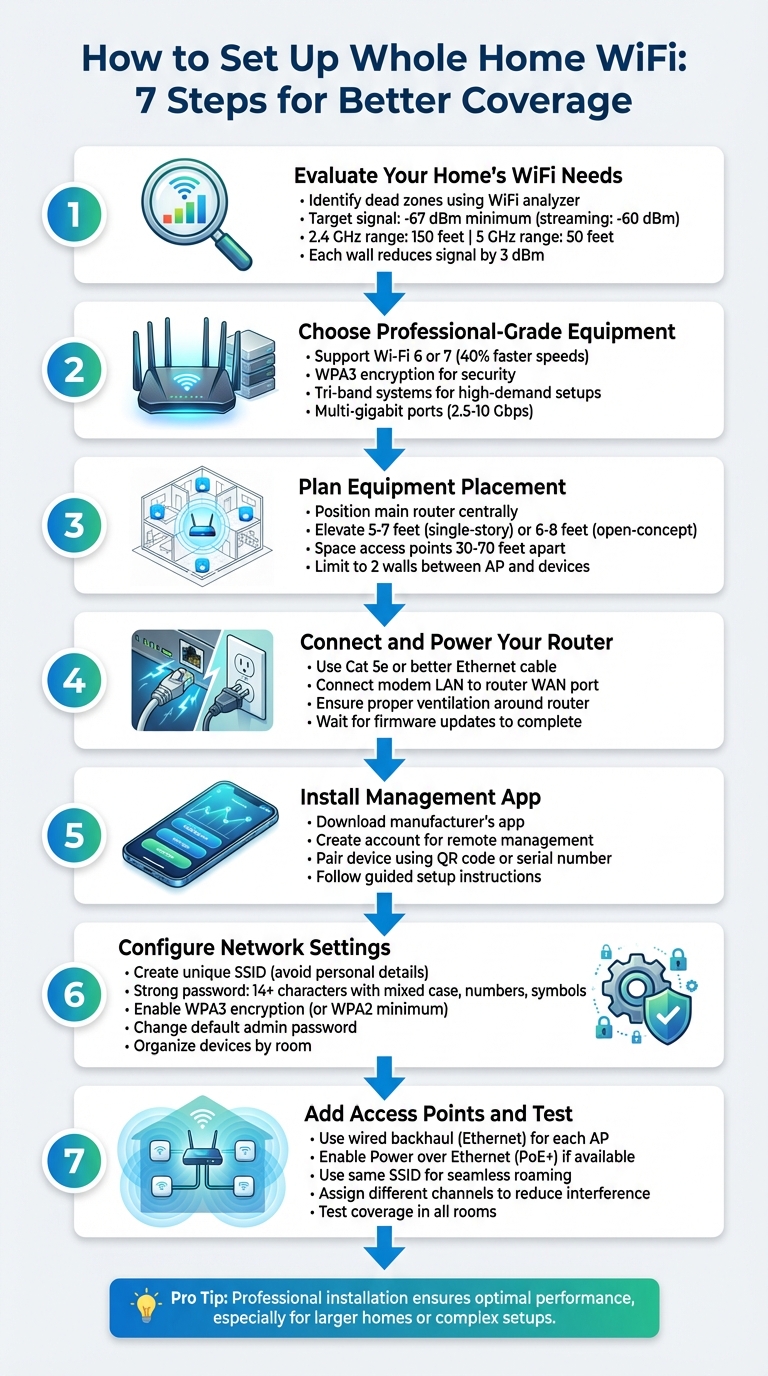
- Evaluate your home’s WiFi needs: Identify dead zones and signal weak spots using a WiFi analyzer.
- Choose the right equipment: Opt for professional-grade hardware with support for the latest Wi-Fi standards like Wi-Fi 6 or 7.
- Plan placement: Position the main router centrally and additional access points in weak areas.
- Connect and power your router: Use Ethernet cables for stable connections and ensure proper ventilation.
- Install the management app: Simplify setup and network management with the manufacturer’s app.
- Configure settings: Set a unique network name, strong password, and enable security features like WPA3.
- Add access points: Use wired backhauls for better performance and test coverage to ensure all areas are connected.
Key Tip: Professional installation can save time and ensure optimal performance, especially for larger homes or complex setups.
7 Steps to Set Up Whole Home WiFi Coverage
Step 1: Evaluate Your Home’s WiFi Requirements
Start by assessing how well your WiFi is performing before deciding to upgrade your equipment. A WiFi dead zone is any area in your home where you should have a connection but don’t. These dead spots can disrupt streaming, apps, or video calls, making them a real headache [2].
Understand What Weakens Your WiFi Signal
WiFi signals naturally lose strength as they move through your home. Materials like concrete, brick, and steel can absorb or bounce these signals, creating gaps in coverage [7][8][9]. For example, just one plaster or concrete wall can weaken your signal by 10–15 dB [5]. On top of that, electronic devices like microwaves and cordless phones – especially those using the 2.4 GHz band – can interfere with your WiFi [7][8].
Distance is another factor. A 2.4 GHz WiFi signal can reach up to 150 feet indoors, while a 5 GHz signal typically covers about 50 feet [7]. However, doubling the distance between your device and the router reduces the signal by 6 dBm, and each wall or obstacle can cut it down by another 3 dBm [10].
Knowing these factors can help you map out your home’s signal strength and pinpoint problem areas.
Map Your Signal Strength
WiFi signal strength is measured in decibel milliwatts (dBm), shown as negative numbers. The closer the number is to 0, the stronger the signal. For instance, -30 dBm is excellent, while -90 dBm usually means no connection at all [3]. Ideally, you want at least -67 dBm throughout your home. If you stream a lot of videos, aim for -60 dBm or better. Anything below -70 dBm suggests your router or access point might be too far away [6].
To map your signal strength, walk through your home with a connected device like a phone, tablet, or laptop. Observe where WiFi bars increase or drop [3][5]. For more accurate readings, use a WiFi analyzer app. Android users can try apps like WiFi Analyzer or OpenSignal, while iOS users can enable the WiFi scanner in AirPort Utility or use NetSpot [2][4][5]. These tools will give you exact dBm readings for each location, making it easier to identify weak spots.
Once you’ve identified the areas with poor coverage, you’ll be better equipped to choose solutions that address those specific issues.
Step 2: Choose Professional-Grade Equipment
Once you’ve mapped your signal strength, it’s time to invest in professional-grade equipment. Designed to handle high traffic, advanced security needs, and scalability, these systems are perfect for larger homes packed with multiple users and smart devices [12].
Why Professional-Grade Equipment Stands Out
Professional-grade systems excel where consumer-grade options often fall short. They’re built to handle dozens of simultaneous connections while delivering consistent performance. This makes them ideal for activities like video conferencing, HD streaming, and managing smart home devices – all without a hitch.
Security is another key advantage. These systems typically come with WPA3 encryption, built-in firewalls, and VPN support, giving your network an extra layer of protection against unauthorized access. Many also feature automatic firmware updates, so your network stays secure without you having to lift a finger.
Look for Compatibility and Upgrade Options
When choosing equipment, prioritize those supporting the latest Wi-Fi standards, such as Wi-Fi 6 or 6E. These standards offer up to 40% faster speeds and better management for multiple devices [13]. Tri-band systems are also a smart choice, as they can effectively balance traffic in high-demand setups.
For a stable and reliable network, consider using wired backhauls with Cat6 or Cat6a cables and PoE (Power over Ethernet) switches. Opt for routers with multi-gigabit ports (2.5 Gbps or 10 Gbps) and multiple Ethernet connections to reduce wireless congestion and maintain fast, steady connections. Finally, plan where to place your equipment strategically to get the best possible network performance.
Step 3: Plan Where to Place Your Equipment
Getting the placement of your networking equipment right is essential for a reliable whole-home WiFi system. Even the best hardware won’t perform well if it’s in the wrong spot. The key is to ensure your signal reaches as far as possible while avoiding interference from walls, furniture, and other obstacles. Use the signal strength map you created in Step 1 to pinpoint the best locations.
Position Your Main Router
For your main router, aim for a central location so the signal can spread evenly throughout your home. In multi-story homes, placing the router on the main living level helps the signal travel both upward and outward. If you’re in a two-story house, keeping the router on the primary level often works best for balanced coverage.
Elevate the router on a high surface, like a shelf or wall bracket, at about 5–7 feet off the floor in single-story homes or 6–8 feet in open-concept spaces. This height helps the signal clear low-lying obstructions. Avoid hiding the router inside cabinets or closets, as this can weaken the signal and even cause overheating.
Keep it away from devices that can interfere with the signal, such as microwave ovens, cordless phones, Bluetooth gadgets, baby monitors, and large metal objects like refrigerators or filing cabinets. Dense materials like brick, concrete, or large mirrors can also disrupt the signal, so steer clear of these. Finally, avoid placing the router near windows – this can waste coverage and may pose security risks.
Position Additional Access Points
To extend your network’s reach, use your survey data to decide where additional access points (APs) are needed. Focus on areas with weak coverage and place APs strategically. Ideally, keep them 30–70 feet apart to minimize overlap, especially on the 2.4 GHz band[10].
Mount access points high on walls or ceilings to improve signal strength. Each AP should be centrally located within its coverage area. As a general guideline, try to limit the number of walls between an AP and your devices to two, as each wall can weaken the signal by about 3 dBm. In multi-story homes, stagger the placement of APs across different floors to cover both vertical and horizontal spaces effectively. If obstacles like concrete slabs or dense bookshelves block the signal, use multiple APs to route around them instead of trying to go through them directly.
Step 4: Connect and Power Your Main Router
Now that you’ve pinpointed the best location for your router, it’s time to get it connected and powered up. Start by grabbing an Ethernet cable – Cat 5e or better is recommended for the best performance. Plug one end into the LAN port on your modem (or ONT, if you’re using fiber internet), and the other end into your router’s WAN port. The WAN port is usually labeled "Internet" and often stands out with a different color to make it easy to spot [14].
Next, connect your router to a power source using the included power adapter. Make sure to use an outlet that isn’t controlled by a wall switch – this helps avoid accidental power cuts. Once plugged in, your router should power on automatically. Look for indicator lights; they’ll confirm that the device is receiving power and establishing a network connection. To avoid overheating, leave a few inches of space around the router for proper airflow.
Give the router a minute or two to boot up. During this time, it might automatically update its firmware to ensure everything runs smoothly [15]. Once it’s fully powered and updated, you’re ready to move on to configuring your network settings.
Step 5: Install the Management App
Once your router is up and running, the next step is to download its management app. These apps are designed to make both the setup and ongoing management of your network much easier.
Start by opening the app store on your smartphone or tablet – either the App Store for iOS devices or the Google Play Store for Android. Search for the app provided by your router’s manufacturer (you’ll usually find the name in the manual or on the device itself). Download and install the app, then open it to begin the setup process.
You’ll likely need to create an account using your email and a strong password. This step is essential for enabling features like remote network management. Once registered, the app will prompt you to connect your phone to the router. Most apps simplify this step by using a QR code or the router’s serial number to quickly pair with the device.
The app will walk you through the setup process with easy-to-follow instructions, so even if you’re not a tech expert, you’ll have no trouble getting things configured. Beyond setup, this app becomes your go-to tool for managing your network and adjusting settings as needed.
sbb-itb-c5b321b
Step 6: Configure Your Network Settings
It’s time to set up your network to ensure it’s both secure and easy to manage. Start by choosing a network name (SSID) that’s unique but doesn’t reveal personal details like your last name or address. Avoid generic names like "NETGEAR" or "Linksys" – these can make your network more vulnerable to unauthorized access.
Create a strong SSID and pair it with a secure passphrase. Aim for at least 14 characters, mixing uppercase and lowercase letters, numbers, and symbols. For example, try something like "BluePine!Zebra#Sky99" or "ClosetLamp#Bathroom99." Avoid common or easily guessed phrases like birthdays, pet names, or simple words.
Next, change your router’s administrative password immediately. Sticking with the default credentials is like leaving your front door wide open. If your router supports WPA3 encryption, enable it for top-tier security. If WPA3 isn’t available, at least use WPA2 to keep your network protected.
Many router management apps allow you to organize devices by room as you add them to your network. For example, you can label access points as "Kitchen", "Upstairs Hallway", or "Master Bedroom." This makes troubleshooting a breeze. If someone reports slow speeds in the living room, you’ll know exactly which access point to check.
Once your settings are in place, it’s time to test your connection.
Test Your Initial Connection
Before setting up additional access points, confirm that your main router is functioning as it should. Use your router’s management app to run a network test or mesh test. This will check your internet speed and ensure the router is communicating with your modem. Walk around your home and test the signal strength in different areas. This gives you a baseline to compare when you expand your network with extra access points.
Step 7: Add Access Points and Test Coverage
To strengthen your network, install access points (APs) in areas where the signal is weak. Connect each AP to your router using an Ethernet cable – this method, called wired backhaul, avoids the speed loss often associated with wireless extenders [16][17][18]. Many professional-grade APs support Power over Ethernet (PoE+), meaning the same Ethernet cable supplies both power and data, eliminating the need for a separate power outlet [18].
Position APs in central, open locations, ideally on different floors or in rooms where earlier testing revealed weak coverage. Mounting APs on ceilings or elevated surfaces can help improve coverage and enhance signal penetration [18][19].
Set up each AP through its configuration interface. Use the same network name (SSID) as your main router to ensure seamless roaming for your devices without connection drops [16]. Assign each AP to a different Wi-Fi channel to reduce interference. Many APs have an "auto" setting, or you can use a Wi-Fi analyzer app to identify the least congested channels [16][19].
Once installed, test the signal strength in every room using a smartphone or laptop. Utilize your router’s app to perform a mesh test, which evaluates how effectively your APs communicate with each other. If you notice weak spots or dead zones, adjust the AP placement. Even a small shift in position can significantly improve performance. Make sure to test under everyday conditions with your usual devices to get an accurate sense of how the network performs in real-life scenarios [20].
Turn On Advanced Features
After confirming full coverage, take advantage of advanced settings to optimize your network. Enable guest networks to keep visitors off your primary network and safeguard your smart home devices. If your router supports band steering, turn it on – this feature automatically guides devices to the most suitable frequency band (2.4 GHz for better range, 5 GHz or 6 GHz for faster speeds). Additionally, activate Quality of Service (QoS) settings to prioritize bandwidth for activities like video calls or streaming, ensuring smooth performance even with multiple devices online.
Professional Installation and Support
Opting for professional installation ensures your WiFi system performs at its best. Experts know how to strategically position equipment to tackle challenges like thick walls or electronic interference. They also bring the know-how to configure networks and troubleshoot issues, tailoring the setup to maximize coverage throughout your home [21].
One Sound Choice specializes in designing and installing whole-home WiFi systems for families in Northern New Jersey. With over 30 years of experience and more than 2,500 successful installations, they seamlessly merge enterprise-level networking with your smart home devices. Their team evaluates your existing setup, selects professional-grade hardware that can handle multiple simultaneous connections, and fine-tunes your network for peak performance [1][11].
But their service doesn’t stop at installation. Ongoing professional support ensures your network adapts to your evolving needs. One Sound Choice enhances security with WPA3 protocols, separates guest and IoT networks for added privacy, and uses wired backhaul connections for greater stability – perfect for bandwidth-heavy activities and ensuring your smart home runs smoothly [10][11].
Professional installation not only saves you the time and hassle of a DIY setup but also ensures your network is optimized from the start [21]. This approach aligns with a reliable, professionally integrated smart home network, making your experience seamless.
For families in Northern New Jersey looking for dependable, user-friendly technology solutions, One Sound Choice offers more than just installation. Their trusted-advisor approach and comprehensive post-installation support ensure your WiFi system is easy to use, built to last, and designed to fit seamlessly into your daily life.
Conclusion
By following these seven steps – from assessing your needs to strategically adding access points – you can achieve consistent WiFi performance throughout your home. Professional-grade systems are designed to provide extended range, reliable performance, and the flexibility to grow with your needs.
The key to dependable connectivity lies in using high-quality equipment paired with expert configuration. These professional-grade systems are built to handle the ever-increasing number of connected devices and higher bandwidth demands that modern households require [22]. Unlike standard consumer solutions, they offer the kind of stability and reliability your family relies on every day. When paired with professional installation, this reliability reaches an entirely new level.
With expert installation, common issues like interference are addressed, and coverage is optimized for your specific space. Professionals have the skills to overcome signal obstacles, fine-tune advanced settings, and ensure every inch of your home – even outdoor areas – has strong, consistent WiFi coverage before they finish the job [23].
For families in Northern New Jersey, One Sound Choice brings over 30 years of expertise to every project. They seamlessly integrate enterprise-level networking with your smart home system and provide ongoing support to meet your home’s evolving connectivity needs.
FAQs
Why should I choose professional-grade WiFi equipment over consumer-grade options?
Professional-grade WiFi equipment offers higher speeds, stronger reliability, and better security, making it a smart choice for larger homes or spaces with heavy internet usage. These systems are built to support multiple devices at once, minimize dead zones, and maintain steady performance even in more complex layouts.
What sets professional systems apart from consumer-grade options is their focus on durability and scalability. They’re designed to integrate smoothly with smart home devices, ensuring your network runs efficiently without interruptions or restrictions.
What’s the best way to position my WiFi router and access points for optimal coverage?
To improve your WiFi coverage, position your router in a central spot on a raised, open surface. Avoid placing it near walls, bulky furniture, or electronic devices that might interfere with the signal. Steer clear of corners, basements, or enclosed areas, as these can limit the router’s effectiveness. Also, keep it away from interference sources like microwaves and cordless phones, which can disrupt the signal.
If you live in a larger home, a mesh WiFi system or additional access points can help maintain strong coverage throughout. Be sure to place these devices strategically to eliminate dead zones, ensuring they remain within the main router’s range for smooth and reliable connectivity.
Why should I hire a professional to install my whole-home WiFi system?
Hiring a professional to set up your whole-home WiFi system can make all the difference in achieving top-notch performance and dependable coverage. They know exactly where to position access points to wipe out dead zones, boost signal strength, and provide smooth, uninterrupted connectivity throughout your home.
Beyond just placement, professionals take care of the tricky stuff – configuring advanced settings, handling wiring, and securing your network. This doesn’t just save you time and hassle; it also ensures your system is customized to support everything you need, whether it’s working from home, streaming your favorite shows, or running smart home devices seamlessly.