
If you want your backyard ready for summer, start planning now. By kicking off in late March, you’ll have enough time to design, install, and test outdoor systems before the season begins. Here’s what to focus on:
- Set Goals: Decide how you’ll use the space – entertainment, dining, security, or play – and list the features you need, such as smart lighting, outdoor TVs, or security cameras.
- Build the Foundation: Install enterprise-grade outdoor Wi-Fi and ensure safe, code-compliant electrical wiring with GFCI protection.
- Choose Systems: Opt for weatherproof smart lighting, durable outdoor entertainment setups, and professional-grade security cameras.
- Create a Timeline: Schedule consultations in March, installations in April-May, and testing in May-June to ensure everything runs smoothly by Memorial Day.
Early planning ensures your systems are reliable, safe, and tailored to your needs, making summer gatherings stress-free and enjoyable.
Step 1: Define Your Backyard Goals and Requirements
Before reaching out to a professional installer, take some time to figure out how you want to use your backyard. For instance, hosting family movie nights might require weatherproof, high-brightness screens, while outdoor dining could benefit from smart grills that monitor temperatures remotely and even suggest recipes. If you have kids, you might prioritize play areas with proper lighting and security systems. The activities you plan will shape the technology you’ll need.
List Your Required Features and Functions
Start by jotting down the specific features your backyard should include. Are you thinking about automated lawn care with GPS-guided robot mowers that work day or night? Perhaps you’re envisioning gatherings with high-quality audio zones for music. Security is another key consideration – pan-and-tilt floodlight cameras or smart delivery boxes could offer more protection than standard doorbell cameras.
Kathy Sides, Co-founder of Loxx Boxx, explains: "While solutions such as doorbell cameras and sensors have become increasingly popular, they simply capture footage of porch piracy and do not prevent the actual theft" [4].
Environmental comfort is another area to think about. Smart mosquito repellents can create a scentless, 20-foot barrier, while devices like the Rachio smart irrigation controller adjust watering schedules based on weather forecasts and soil moisture levels, helping to conserve water and cut costs. Don’t forget to ensure that all devices are rated to withstand harsh weather conditions, as indicated by their IP rating [3].
Focus on Long-Term Performance and Property Value
It’s not just about meeting your immediate needs – think about how these upgrades will perform over time and how they might increase your property’s value. Professionally installed systems, such as enterprise-grade Wi-Fi, GFCI-protected electrical circuits, and integrated control platforms, are permanent improvements that can serve your family for years to come.
Mark Benson, Head of SmartThings, highlights: "As smart home technology evolves, we can expect even more innovative solutions for outdoor living. From automated irrigation systems to intelligent lighting and climate control, the future of outdoor living is set to become increasingly seamless, efficient and tailored to the needs of modern homeowners" [4].
Professional installations also unify your outdoor systems on a single platform, making everyday use more convenient and appealing to potential buyers who value ready-to-go smart home features.
sbb-itb-c5b321b
Step 2: Plan Your Outdoor Technology Infrastructure
Once you’ve outlined your backyard goals, the next step is setting up a reliable technology infrastructure. Without a solid foundation, even the best systems can fall short. Two key aspects to focus on are dependable outdoor Wi‑Fi coverage and safe, code-compliant electrical wiring.
Install Enterprise-Grade Outdoor Wi‑Fi
Indoor routers usually struggle to cover outdoor spaces effectively, especially if you’re streaming 4K video on an outdoor TV or running security cameras along your property’s edge. Walls and open spaces weaken standard signals, leading to buffering or lag during high-bandwidth tasks. Professional installers address this by using enterprise-level access points and advanced techniques like Quality of Service (QoS) and dedicated SSIDs.
These enterprise-grade devices are built to handle multiple high-demand activities simultaneously, such as music-synced lighting and 4K video streaming. For devices located farther out, like irrigation controllers or perimeter sensors, long-range technologies like LoRa can extend connectivity up to half a mile for low-bandwidth needs [5].
A well-planned outdoor network can also include QoS rules or separate SSIDs to prioritize critical tasks, ensuring smooth performance even when multiple devices are in use. Once your network is in place, it’s time to focus on powering your devices effectively.
Plan Electrical Wiring and Power Requirements
Licensed electricians play a crucial role in designing your backyard’s power setup. Outdoor installations require GFCI-protected wiring to meet safety codes and prevent electrical hazards [1]. Strategically placed outlets at the right heights and locations ensure easy access for devices like cameras, TVs, and sound systems.
Different devices come with unique power needs. For instance, LED light strips require 12V or 24V drivers housed in ventilated, weatherproof enclosures to prevent overheating or water damage [1]. Security cameras might use Power over Ethernet (PoE), batteries, or solar panels. High-power devices like outdoor heaters or smart grills can consume 10–15 amps or more, making dedicated circuits essential to avoid system overload [1].
Professional installers carefully plan these requirements before starting work, ensuring each area of your backyard has adequate power and protection. They also use IP-rated connectors and enclosures – IP65 for splash resistance or IP67 for areas exposed to heavy rain [1].
Step 3: Select and Install Smart Outdoor Systems
With your infrastructure ready, it’s time to choose and install the smart systems that will bring your outdoor space to life. Now that outdoor Wi‑Fi and electrical setups are in place, you can focus on integrating advanced technologies designed to handle tough weather conditions while delivering dependable performance for everyday use.
Outdoor Entertainment Systems
For a seamless audio experience, consider integrating landscape speakers, in-ceiling options, and underground subwoofers. These setups provide consistent, high-quality sound without compromising your yard’s appearance [8]. Families with children may appreciate multi-zone audio, which allows different areas to play separate content – kids can enjoy their playlist in one section while adults listen to something else nearby [7].
When it comes to outdoor TVs, the level of sun exposure is a key factor. Brands like Séura offer an 86-inch 4K Ultra HD model specifically designed for full-sun environments [6]. Other models are better suited for partial-sun or shaded areas. These outdoor displays are built to withstand rain, snow, dust, and insects, and they operate across extreme temperatures, from scorching heat to freezing cold [6]. Indoor TVs simply aren’t equipped for these conditions – they’re vulnerable to glare, overheating, and moisture damage.
Weatherproof Smart Lighting
Smart lighting not only enhances the look of your backyard but also adds an extra layer of safety. By dividing your space into zones, you can use lighting to define different areas: warm tones for dining, soft ambient lights for lounging, brighter options for pathways and stairs, and colorful RGBIC effects for lively gatherings [1]. Layered lighting ensures that safety features remain active even when ambiance settings are adjusted.
For a polished installation, professional setups often use aluminum channels with diffusers to mount LED strips. This approach improves heat dissipation and creates a clean, finished appearance [1]. Ensure that all fixtures meet at least an IP65 rating to withstand outdoor conditions. Matter-certified controllers offer reliable local control with minimal latency (around 200ms), so your lights remain responsive even during internet disruptions [1].
Professional Security Cameras and Motion Sensors
Position cameras 8–10 feet high in corners to maximize their coverage [9]. While outdoor cameras are built to endure the elements, installing them under eaves or gutters can help extend their lifespan. Look for models with a 120–180° field of view, HDR capabilities to manage glare and shadows, and resolutions ranging from 1080p to 4K [9].
Modern security systems often combine radar-powered detection with PIR (Passive Infrared) sensors to minimize false alarms [10]. Customizable security zones let you control which areas trigger alerts – for instance, focusing on your driveway while ignoring a neighbor’s yard. Depending on your setup, cameras can be powered through hardwired connections, batteries, or solar panels [9].
Once your systems are installed, schedule a thorough testing phase to ensure everything is functioning smoothly before summer rolls around.
Step 4: Create Your Project Timeline
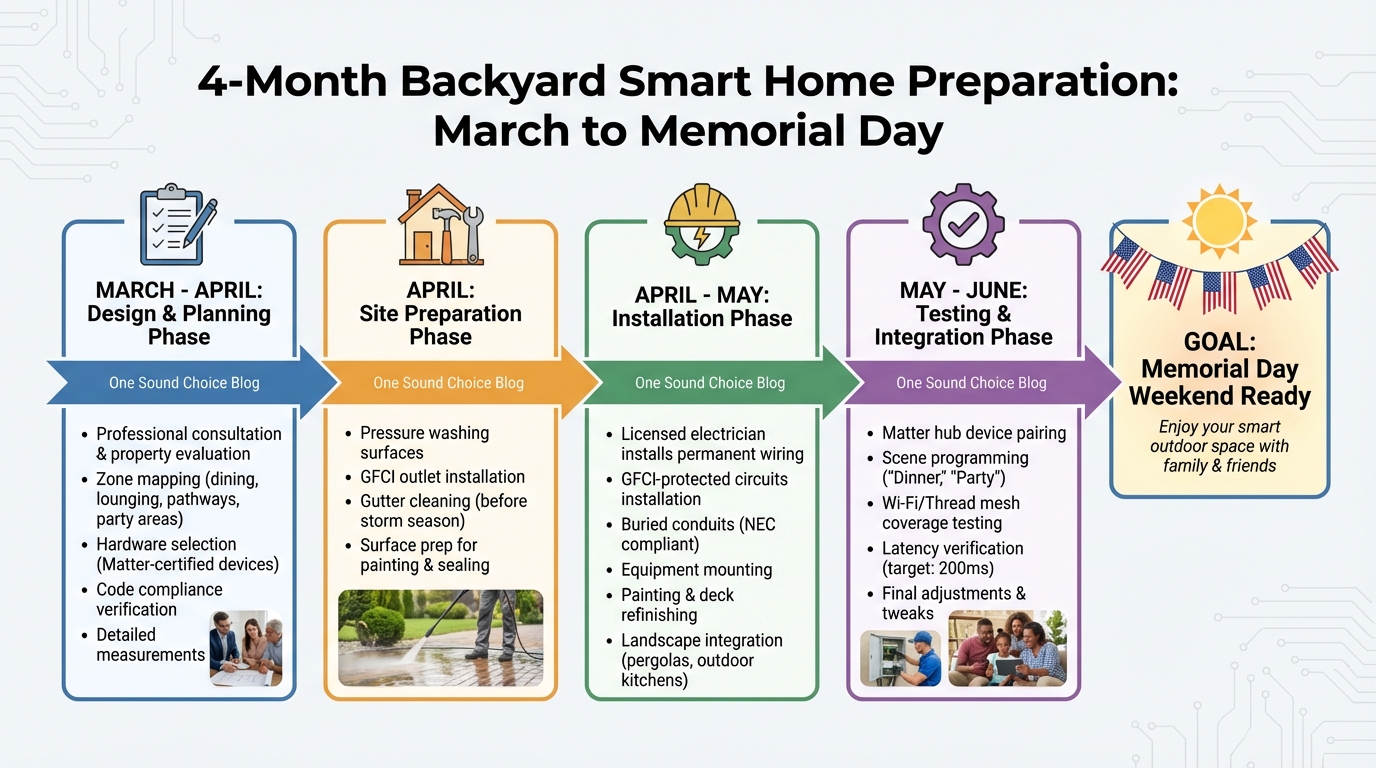
Backyard Smart Home Installation Timeline: March to June Planning Guide
To ensure your systems are up and running by Memorial Day weekend, start planning in late March. This timeline gives you plenty of time to handle design, installation, and testing without rushing.
Schedule Consultation and Design (March–April)
Kick off with a professional consultation to evaluate your property’s current setup and determine your technology needs. During this stage, an integrator will divide your backyard into functional zones – like dining, lounging, pathways, and party areas. They’ll also take detailed measurements to ensure the hardware fits perfectly [1]. Don’t forget to confirm all code requirements and finalize your device choices during this phase [1][12].
Complete Installation (April–May)
Since outdoor installations can take several weeks, book your installation early to avoid the seasonal rush. Licensed electricians will manage permanent wiring, GFCI-protected circuits, and buried conduits to ensure compliance with NEC standards [12]. If your project includes features like pergolas, outdoor kitchens, or garden elements, landscape contractors can integrate power into those designs at this stage. April and May’s warmer temperatures are perfect for prepping surfaces – pressure washing, painting, and deck refinishing are more effective when sealants and paint can cure properly [11]. Be sure to clean gutters before storm season begins to prevent water damage to your new outdoor systems [11]. Once installation wraps up, the focus shifts to integrating and fine-tuning your setup.
Test Systems and Make Adjustments (May–June)
Work with professionals to thoroughly test each component of your system. Pair devices with your Matter hub and program scenes like "Dinner" or "Party" for seamless local control, keeping latency as low as 200 ms [1]. Check Wi‑Fi or Thread mesh coverage in all areas of your yard, especially the farthest zones. If you notice weak signals, consider adding a mesh node or outdoor-rated access point [12]. This testing period is essential for resolving connectivity issues and making any final tweaks before hosting your first summer gathering.
| Project Phase | Key Activities | Recommended Timing |
|---|---|---|
| Design & Planning | Zone mapping, hardware selection (Matter-certified), code checks | March – April |
| Site Preparation | Pressure washing, GFCI outlet and gutter installations | April |
| Installation | Mounting equipment, painting, deck refinishing | April – May |
| System Integration | Hub pairing, scene programming, signal testing | May – June |
Conclusion
Preparing your backyard for summer requires careful planning and timely execution. Starting in late March, you can map out functional zones, choose Matter-certified devices for compatibility, and install enterprise-grade Wi-Fi to ensure your space is equipped for reliable entertainment, security, and lighting that lasts for years.
These steps lay the groundwork for a seamless outdoor transformation. The key to success lies in expert design and installation. Professional integrators manage the technical complexities that guarantee your systems perform reliably, no matter the weather or daily wear and tear. These are not just optional upgrades – they are essential for outdoor technology to function effectively through rain, heat, and heavy use.
Starting the consultation and design process in March or early April provides enough time to handle permits, fabrication, and installation. This approach ensures your space is ready for summer enjoyment while also adding long-term value to your home. By Memorial Day, your systems will be fine-tuned and ready to support everything from relaxed family dinners to lively backyard gatherings.
As Daisy North Jersey wisely states: "A smart home is only as good as its connection" [2]. This applies to every element of your outdoor setup – cameras, speakers, lighting, and security all rely on a strong network foundation. By investing in professional-grade infrastructure now, you’re creating an outdoor space that enhances your property’s value and improves your family’s daily life for years to come.
If you’re ready to take the next step, reach out to a licensed integrator familiar with Northern New Jersey’s unique climate, building codes, and architectural styles. The work you begin today will shape how you enjoy your backyard throughout the summer and beyond.
FAQs
How much does a professional smart-backyard upgrade usually cost?
Upgrading your backyard with professional smart technology can cost anywhere from $10,000 to over $125,000, depending on the scope and complexity of the project. The price is influenced by factors such as the number of systems being integrated, the infrastructure required, and the level of customization involved.
Do I need permits or inspections for outdoor wiring and low-voltage lighting?
Permits and inspections play a key role in outdoor wiring and low-voltage lighting projects in New Jersey. The specific regulations depend on the type of work being done, but in most cases, electrical permits are required to ensure both safety and compliance with state laws. To avoid complications, it’s wise to review local requirements, secure the necessary permits, and arrange for inspections before beginning your project. This proactive approach helps you stay aligned with state regulations and prevents potential setbacks.
What’s the best way to cover my whole yard with reliable outdoor Wi‑Fi?
To maintain dependable outdoor Wi-Fi coverage, consider installing a weatherproof Wi-Fi hub or expanding your network with outdoor access points or mesh systems. Position the nodes or access points where they have a clear line of sight to minimize interference. Whenever possible, use wired backhauls to enhance performance and stability. Aim for optimal placement to ensure strong signal strength, ideally at -65 dBm or better. Regularly test the signal strength and make adjustments as needed to cover your entire yard effectively.