
Creating an outdoor entertainment space is easier than you think. With the right audio and video systems, you can transform your backyard into a year-round hub for movie nights, sports events, and relaxation. Here’s a quick breakdown:
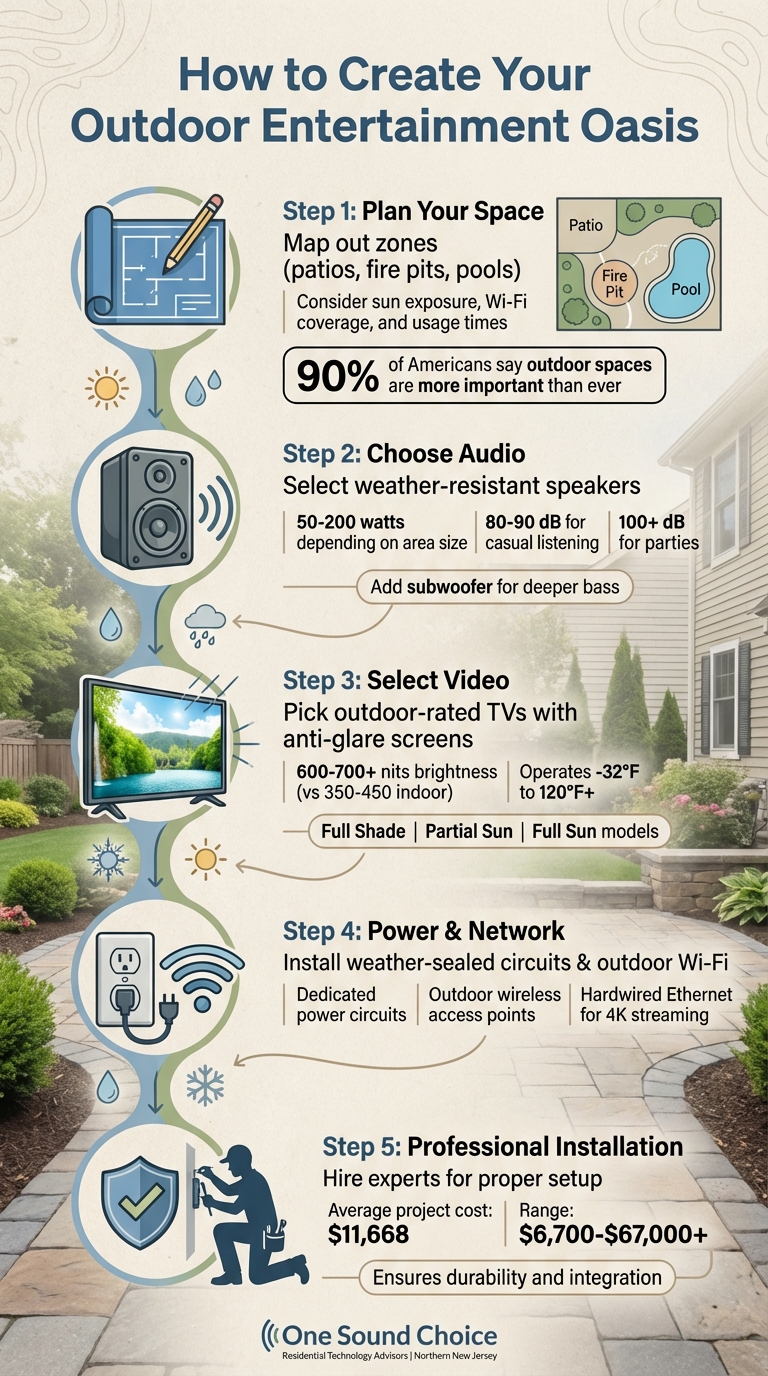
- Plan Your Space: Map out zones like patios, fire pits, or pool areas. Consider sun exposure, Wi-Fi coverage, and how you’ll use the space (daytime vs. evening).
- Choose Audio: Opt for weather-resistant speakers designed for outdoor use. Spread smaller speakers evenly for balanced sound, and add a subwoofer for deeper bass.
- Select Video: Use outdoor-rated TVs with anti-glare screens and sealed enclosures. Match the TV type to the area’s sunlight exposure (shade, partial sun, or full sun).
- Power & Network: Install weather-sealed power circuits and outdoor wireless access points for reliable connectivity.
- Professional Installation: Experts ensure proper setup, durability, and integration, saving you from costly mistakes.
Outdoor systems are built to handle extreme weather, from freezing winters to humid summers. With professional help, you can create a durable, visually pleasing setup tailored to your needs.
5 Steps to Create Your Outdoor Entertainment Oasis
Backyard Paradise! Outdoor Audio and TV Installation Overview
sbb-itb-c5b321b
Evaluate Your Outdoor Space and Entertainment Goals
Take a close look at your outdoor space and how you plan to use it. This step helps avoid unnecessary expenses and ensures your setup aligns with your lifestyle.
Measure Your Space and Identify Key Zones
Start by mapping out your outdoor areas, such as patios, pool decks, fire pits, outdoor kitchens, or pergolas. Each zone may have unique audio and video requirements. While 90% of Americans feel their outdoor living spaces are more important than ever, more than half – 56% – are unhappy with how their spaces function [9].
Pay attention to sun exposure. Label zones based on light conditions – full sun, partial sun, or full shade – to decide where to place screens and select the right brightness levels. Position screens to avoid direct sunlight for better visibility.
"Even with a full sun model, it’s best to position the display where the screen will never be head-on to the sun." – John Sciacca, Custom Installer
Look for physical obstacles like trees, walls, or outbuildings that might block Wi-Fi signals or create sound gaps. Test Wi-Fi coverage in all areas, including detached spaces like garages or pool houses. When planning speaker placement, aim the sound inward from the property line to minimize noise disturbances for neighbors.
Determine How You’ll Use the Space
Think about how you want to enjoy your outdoor area. Are you planning to host parties, watch sports, or have family movie nights? These activities will shape your equipment needs.
Consider the time of day you’ll use the space most. Daytime use might require anti-glare screens and high-brightness displays, while evening use benefits from ambient lighting and sound systems with comfortable audio levels. If you entertain often, focus on creating balanced sound across seating areas rather than isolated loud zones.
"Your backyard entertainment should be designed with both your space and personal preferences in mind." – Paragon Sight & Sound
Professional installations for outdoor AV systems can range from $6,700 to over $67,000, depending on the complexity and features [11]. By understanding your priorities now, you can allocate your budget effectively, ensuring your setup enhances your family’s outdoor experience.
This evaluation lays the groundwork for choosing durable, weather-ready, and professionally installed audio and video solutions tailored to your outdoor retreat.
Select Audio Solutions for Outdoor Use
Choosing the right audio setup for your outdoor space is crucial to ensuring clear and balanced sound throughout your entertainment area. Outdoor speakers must handle weather challenges like rain, extreme temperatures, and UV exposure, all while delivering quality sound across open spaces. The ideal system blends into your landscape and provides even sound coverage, avoiding loud "hot spots" that can disrupt conversations.
Pick Weather-Resistant Speakers That Complement Your Space
Outdoor speakers need to be durable and functional in varying conditions. Look for models that can operate in temperatures ranging from below freezing to over 120°F, with wattage levels between 50–200 watts, depending on the size of your area [8][12]. Ensure they feature weatherproof housings made from corrosion-resistant materials to withstand elements like salt air, pollen, and moisture [6].
To maintain aesthetics, select speakers that blend into your environment. Options include models disguised as natural stones, incorporated into planters, or flush-mounted under eaves for covered areas [13][3][2]. Adding a high-performance subwoofer – preferably one installed underground with only a small vent visible – can provide deep, full-range sound without adding visual clutter [10][2]. For wiring, use hard plastic PVC conduit to protect cables from damage caused by gardening tools, lawnmowers, or pests [13][12].
Ensure Even Sound Distribution Across Your Space
For consistent sound coverage, position smaller speakers throughout your outdoor area. In most residential spaces, a sound level of 80–90 dB works well for casual listening, while party settings may require levels of 100 dB or higher [12].
"Strategically placed speakers and subwoofers create a gentle blanket of volume throughout the yard, rather than two hot spots that force guests to shout." – Perfect Angle AV Solutions [6]
Design your system with independent zones tailored to specific areas like the pool, dining space, or fire pit. This setup allows you to adjust volume levels or play different audio content in each zone simultaneously [8]. To maintain sound quality, wire speakers in mono, ensuring consistent audio regardless of where listeners are positioned [13]. Professional installation can further enhance your system by calibrating it to outdoor acoustics, countering challenges like bass dissipation and treble scattering in open spaces [10][12].
Once your audio system is fine-tuned for clarity and coverage, you can turn your attention to incorporating video displays into your outdoor retreat.
Choose Outdoor TVs and Video Displays
Outdoor video systems need to be specially designed to handle the challenges of being outside. Regular indoor TVs aren’t built to withstand moisture, temperature changes, or direct sunlight, even if placed under a covered patio. For instance, John Sciacca shared an example where a customer’s three 90-inch Sharp LED TVs failed within a year due to exposure [1]. Humidity can cause condensation to seep into electronics not designed for outdoor use, leading to short circuits and voided warranties [8]. Below are some key factors to consider when selecting outdoor TVs and protective solutions to ensure both durability and seamless integration into your outdoor space.
Prioritize Weatherproof Construction and Anti-Glare Screens
Outdoor-rated TVs come with sealed enclosures that keep out moisture, dust, and insects, protecting the internal components [3]. These TVs are designed to function reliably in extreme temperatures, ranging from below freezing to over 120°F [8]. Look for models with panels offering brightness levels of 600–700 nits or higher, compared to the 350–450 nits typical of indoor TVs [14]. This higher brightness ensures the screen remains clear and vibrant, even under bright midday sunlight.
To combat reflections, opt for displays with anti-glare coatings, which help maintain image clarity in direct sunlight [4][3]. Outdoor TVs are categorized by their sun exposure ratings: "Full Shade" models are suitable for covered areas, "Partial Sun" models work well under pergolas or filtered light, and "Full Sun" displays are designed for direct sunlight [14]. For the best viewing experience, position the TV to face north, keeping the sun behind it [14]. Installing the TV on a full-motion articulating mount allows you to adjust its angle throughout the day as the sun’s position changes [14].
Use Protective Storage Solutions
Protecting your outdoor TV when not in use can significantly extend its lifespan and keep it looking great. Motorized lifts or custom cabinetry can conceal the TV, shielding it from rain, pollen, and salt air [8]. Not only does this safeguard the equipment, but it also helps maintain the aesthetic of your outdoor space. For proper installation, ensure all power and signal cables are routed through weather-sealed conduits, which prevent moisture from damaging connection ports [4].
Set Up Power, Networking, and Control Systems
Once you’ve chosen your audio and video components, the next step is ensuring a reliable network and power setup. These systems are the backbone of any outdoor entertainment area, and careful planning during the early stages of your project is crucial. By addressing these needs before landscaping or hardscaping, you can avoid the hassle and expense of making changes later.
Install Reliable Power and Network Connections
Even the best outdoor speakers and displays won’t perform well without a dependable power and network setup. Outdoor AV systems require dedicated power circuits housed in weather-sealed enclosures to protect against moisture, dust, and insects [3][5]. Products like the Snap One VersaBox can securely hold power outlets, media players, and amplifiers in recessed in-wall boxes. Additionally, underground conduits and recessed boxes should include proper drainage to prevent water buildup [16].
Network connectivity is equally important. Indoor Wi-Fi often struggles outdoors due to interference from walls, trees, and distance [8]. To address this, install dedicated outdoor wireless access points (WAPs) designed to withstand the elements [8]. For an even more stable connection, run hardwired Ethernet cables through conduits under patios or decks to connect your outdoor TV and audio components. This ensures smooth 4K streaming without interruptions during movies or games [6].
"A great way to tackle lag is to incorporate wireless access points into your outdoor audio system, rather than relying just on the signal from indoors." – World of Sound & Vision [8]
Connect All Components to a Single Control System
After securing power and network connections, simplify your setup with a unified control system. Managing multiple remotes and apps can be frustrating, but platforms like Control4, Savant, or Crestron allow you to control everything from a single device, such as a smartphone, tablet, or wall-mounted touch panel [6][7]. These systems can even be programmed with "scenes" like "Movie Night" or "Party Mode", which adjust smart automated lights, start playlists, and switch video sources with a single tap [15][16].
"The key to a fully integrated backyard AV system is smart control… These systems allow you to control the audio and video, outdoor lighting, heating, and even water features, all from one centralized device." – Perfect Angle AV Solutions [6]
A unified control system not only makes operation effortless but also helps you focus on enjoying your outdoor space with friends and family [16]. Professional installers work closely with electricians and landscape architects to plan service access points, ensuring maintenance or upgrades can be done without disturbing your outdoor setup [16].
Design for Appearance and Durability
Creating an outdoor entertainment system that complements your landscape while standing the test of time is key. The most effective designs balance aesthetic appeal with rugged performance, ensuring your setup remains functional and visually pleasing throughout the year.
Hide Technology Within the Landscape Design
A well-thought-out outdoor AV system should blend seamlessly into its surroundings. For example, speakers can be cleverly disguised as rocks, planters, or bollards that naturally fit into garden beds. Alternatively, they can be flush-mounted under eaves, embedded in retaining walls, or recessed into patio structures for a more streamlined look [3][2][17].
Video displays can also benefit from subtle integration. Motorized TV lifts, for instance, allow screens to rise from custom cabinetry or stone countertops when needed, then disappear when not in use [2][17]. For bass enthusiasts, in-ground subwoofers provide deep sound while keeping visual distractions to a minimum – only a small port remains visible [17].
"Starting early ensures the most cohesive and cost‐effective result. The initial design phase is the perfect time to plan a fully integrated outdoor entertainment system." – Ratio AV [3]
Collaborating with professionals during the early design stages ensures a smooth installation process. Proper conduit placement and wiring can be addressed before hardscaping begins, avoiding costly and inconvenient retrofits later on [3][17]. Equipment like amplifiers and control hardware can be tucked away in recessed in-wall enclosures, such as Snap One’s VersaBox, keeping everything out of sight while maintaining accessibility [1].
By integrating these hidden solutions with expert planning, you can achieve both performance and longevity in your outdoor system.
Hire Professionals for Installation
After designing a system that seamlessly incorporates hidden technology, the next step is professional installation. This ensures your system delivers reliable performance year-round. Outdoor-specific equipment is built to withstand elements like moisture, dust, and insects, thanks to sealed enclosures [8][3].
Using indoor-rated equipment outdoors is a recipe for disaster. Standard electronics are vulnerable to moisture damage, which not only causes failures but also voids warranties. Professionals, on the other hand, calibrate your system to account for unique outdoor factors such as acoustics, sunlight, and glare. They also hard-wire connections to ensure smooth, lag-free 4K streaming [17][6].
"A knowledgeable installer accounts for those factors on day one… you do not want to pay extra to hire a company to fix somebody else’s mistakes. Do it right the first time around!" – Perfect Angle AV [6]
With the average outdoor entertainment project costing $11,668 in 2023 [17], hiring experienced professionals from the start safeguards your investment. It also ensures your outdoor space becomes a safe, enjoyable retreat for your family to use throughout the year.
Conclusion
A professional installation transforms your backyard into an extension of your home, blending indoor comfort with outdoor functionality. Designed to endure extreme conditions – ranging from freezing temperatures to over 120°F, as well as rain, humidity, and even salt air – these systems provide dependable performance throughout the year [2][8].
Experts ensure consistent sound coverage across your yard, eliminating "hot spots" where guests might struggle to hear or need to raise their voices [6]. They also install dedicated outdoor wireless access points, tackling lag and buffering issues that can disrupt streaming [8]. Beyond that, they integrate audio, video, lighting, and controls into a single, easy-to-use interface tailored to your family’s needs [6][7].
Engaging professionals during the design phase ensures essential elements like conduit placement, dedicated power circuits, and network infrastructure are addressed before hardscaping begins [3]. This foresight safeguards your investment and creates a system that enhances your family’s enjoyment for years to come. When it’s time to create an outdoor space that matches the performance of your indoor setup, partnering with skilled professionals ensures a durable, thoughtfully designed system. It’s not just about this summer – it’s about building an outdoor retreat that elevates your lifestyle for many seasons ahead.
FAQs
What’s the best way to choose speaker locations for even sound?
To ensure balanced sound coverage in outdoor spaces, it’s important to understand how sound disperses in open areas without walls or ceilings. Position left and right speakers roughly 10 feet apart to create an even audio balance. Place additional speakers near seating areas and along pathways to eliminate any sound gaps. Opt for weather-resistant speakers that blend seamlessly into the surroundings to maintain both functionality and visual appeal. For the best results, consider professional installation to fine-tune placement and ensure consistent audio performance throughout the space.
Do I really need an outdoor-rated TV for a covered patio?
Yes, you do need an outdoor-rated TV for a covered patio. Indoor TVs are not designed to cope with moisture, temperature changes, or even indirect exposure to outdoor elements. Even in a covered area, these factors can damage an indoor TV, reduce its performance, and create potential safety hazards. Outdoor-rated TVs are built specifically to handle these conditions, offering durability and dependable performance in outdoor settings.
How much should I budget for a professionally installed outdoor AV system?
A professionally installed outdoor AV system generally costs between $5,000 and $15,000. The exact price varies based on factors such as the system’s complexity, the quality of the equipment chosen, and any unique installation requirements. This investment ensures a dependable, high-quality setup designed to fit your specific space and preferences.