
When building or renovating a home, planning smart home technology early can save time, money, and headaches. Waiting too long to involve a technology integrator often leads to costly changes, delays, and compromises. Here’s how to ensure your smart home setup is efficient, reliable, and well-integrated:
- Define Your Smart Home Goals Early: Identify the systems you want – networking, security, entertainment, climate control – and include them in the blueprints before construction begins.
- Pre-Wire During Construction: Installing wiring during the rough-in phase is far less expensive and disruptive than retrofitting later. Plan for features like Cat6A cabling, speaker wires, and conduits for future upgrades.
- Hire a Qualified Integrator: Choose an experienced professional early in the process to coordinate with builders and ensure proper infrastructure for your smart home.
- Align Installation with Construction Phases: Smart home installations should follow construction stages, from pre-wiring during rough-in to final testing before move-in.
- Plan for Testing and Support: Ensure all systems are tested thoroughly, and consider a service package for updates and maintenance.
The Builder & Integrator Duo Shaping Smart Homes | Drees Homes & HomePro
sbb-itb-c5b321b
Step 1: Set Your Smart Home Goals Before Construction Starts
If you wait until after framing and electrical plans are finalized, builders will base their bids on standard electrical work rather than the specific needs of your smart home. This often leads to costly change orders and compromises that could have been avoided with proper planning from the outset.
"The technology plan for the home should be created before getting framing, electrical, and HVAC bids. This will save you all sorts of retrofit headaches and expense down the line." – Home Technology Association [1]
The first step is to outline the systems required to bring your vision to life.
Prioritize Your Smart Home Systems
Start by identifying the systems that are most important to your household. A wired-first network is essential, using Cat6A or fiber cabling as the foundation. This setup supports advanced technologies like Wi-Fi 7 access points and high-bandwidth devices, such as 8K TVs [3][4]. To ensure seamless connectivity, plan for one wireless access point for every 1,350 square feet of living space [4]. For security and access control, hardwired PoE cameras, smart locks, and video doorbells are excellent choices. These devices perform more reliably with wired connections compared to wireless ones [3][5].
Plan Your Features Early
Defining your smart home features during the planning stage can help you avoid expensive retrofits later. Think about how each room will function. For example:
- Use centralized lighting and shading systems to eliminate the need for multiple switch banks [1][6].
- Consider entertainment systems, such as whole-home audio with in-wall speakers, home theaters with acoustic treatments, or gaming rooms requiring low-latency networking [3][7].
- Account for energy management needs. The 2024 IECC mandates at least one EV-capable, EV-ready, or EVSE-installed space per new home, so ensure your electrical panel has enough capacity and plan for conduit to the garage [3].
Climate and wellness features are also becoming popular. These include smart thermostats, indoor air quality sensors, and circadian lighting that adjusts throughout the day to improve sleep patterns [1][3]. Additionally, water management systems, like smart shutoff valves and leak detectors in critical areas such as kitchens and laundry rooms, can help prevent significant water damage [3].
Incorporate Smart Home Needs into Your Blueprints
Once you’ve outlined your desired features, work with a qualified technology integrator to incorporate these requirements into your building plans. This process involves creating detailed wiring diagrams and equipment placement plans that are integrated into the master architectural set. These documents ensure that trades like electrical, HVAC, and framing can bid accurately on the entire project scope [2][9].
"A qualified technology integrator can provide electrical, cooling, and framing requirements for these trades to bid on the project accurately. This, in turn, results in fewer change orders and project delays." – Home Technology Association [2]
Your blueprints should also specify key infrastructure elements, such as:
- Dedicated power sources for equipment racks.
- Cooling and ventilation for AV closets where heat-generating devices like processors and amplifiers are stored.
- Structural backing for heavy items like large displays or motorized shades [8][9].
Additionally, include strategic conduit runs to future-proof your home. For example, plan conduits to the roof for solar panels or antennas, to exterior soffits for security cameras, and to the garage for potential EV charging upgrades. This forward-thinking approach minimizes the need for demolition or visible retrofitting as technology evolves [3].
Step 2: Schedule Installations to Match Construction Phases
With your plans in place, the next step is aligning the installation timeline with your construction schedule. Proper timing ensures everything runs smoothly and avoids unnecessary expenses.
One of the most common pitfalls is involving your smart home integrator too late. Each stage of construction has specific tasks that need to be completed in sequence, and missing these can lead to expensive change orders or delays.
Smart home installations typically follow a structured process: consultation and design occur during pre-construction, low-voltage wiring happens in the rough-in phase, device installation takes place after drywall is completed, and final programming is done once you’re ready to move in. Skipping or mistiming any of these steps can create challenges that are both frustrating and costly to resolve.
When to Install Low-Voltage Wiring
The rough-in phase is the key time to install low-voltage wiring. This step comes after the framing is finished and electrical rough-ins are completed, but before insulation and drywall are installed [5]. During this phase, your integrator will run essential cabling, such as Cat6 for your network, speaker wires for audio systems, and other low-voltage connections your setup requires.
A wired network can support speeds up to 10 gigabits per second, far outpacing most wireless mesh systems [4]. Completing this work during rough-in is much more cost-effective than retrofitting later. Even if you’re not planning to use certain devices right away, pre-wiring for features like speakers, cameras, and access points during construction can save you from expensive renovations down the line [6].
Final Testing and Programming
Once construction is complete, set aside 3–5 days before moving in for final system testing and programming. This allows your integrator to ensure that all components are functioning correctly and tailor automation settings to fit your lifestyle [6].
During this stage, the integrator will test key systems, including HVAC controls, smart lighting control systems, security cameras, and entertainment setups. They’ll also run appliances like your dishwasher and washing machine to confirm proper integration. Additional checks include verifying that smart locks operate as intended and that smoke and carbon monoxide detectors are fully connected to your system. A final walkthrough will give you the chance to review everything and confirm that the project meets your expectations.
Step 3: Hire the Right Smart Home Integrator
Finding the right integrator is just as critical as choosing your builder. This professional will design, install, and support the smart home systems that you’ll rely on for years to come.
One of the most common missteps is bringing the integrator into the project too late – after framing, electrical work, and HVAC bids are already locked in. This can lead to missed opportunities for essential infrastructure planning. Scott Newnam, CEO of Audio Advice, emphasizes this point:
"The number one error that we see is when the integrator gets brought in too late" [10].
To avoid this, involve your integrator as early as possible, ideally before any bids are finalized [10]. Early coordination allows them to work alongside your builder to address critical needs, like reinforced framing for heavy TV mounts or dedicated electrical circuits for equipment racks. This collaboration ensures that your infrastructure is ready to support your smart home from the ground up.
What to Look for in an Integrator
Start by checking certifications. Seek out firms that are HTA (Home Technology Association) Certified, an indicator of top-tier technical skills and professionalism [4]. Additionally, ensure the team includes technicians with CEDIA certifications, such as CIT or Networking Specialist credentials. These certifications demonstrate expertise in low-voltage wiring and system design, ensuring that your smart home requirements are properly integrated into the construction plans.
Ask about their networking strategy. A strong integrator will recommend enterprise- or SMB-grade networking solutions to ensure reliable performance. Hardwired connections should be prioritized for essential devices like security cameras and wireless access points [4].
Post-installation support is another key consideration. Tyler Jones, CEO of Blue Heron, underscores the importance of ongoing service:
"When the home automation technology isn’t working or something needs to be updated or replaced, we can’t fix that. We don’t know how to go in and change the programming, so we are 100% reliant on our integrators" [6].
Choose an integrator who offers service packages that cover remote monitoring, software updates, and homeowner training to keep your systems running smoothly long after installation.
Why Local Experts Matter
Working with a local integrator comes with several advantages. They are familiar with regional building codes and construction practices, have established connections with local builders, and can respond quickly when issues arise. For example, One Sound Choice, a company with over 30 years of experience and more than 2,500 installations in Northern New Jersey, demonstrates how local expertise can translate into dependable and ongoing support.
Local integrators also build lasting relationships with homeowners. Unlike general contractors who move on once construction is complete, your integrator remains a consistent partner. They handle system updates, add new features as your needs change, and ensure everything continues to function reliably. This ongoing relationship turns a smart home installation into a long-term investment that enhances your daily life.
Step 4: Keep Communication Clear Between All Parties
Once goals are set and installations are scheduled, effective communication becomes the bridge between planning and execution. Smart home projects often involve multiple teams, and without clear, structured communication, delays and costly change orders can quickly arise.
Professional integrators typically assign a dedicated project manager to act as the main point of contact. As Audio Advice explains, "Project management team will manage the scheduling of prewiring, installation, and programming – they act as the liaison between homeowners and contractors to handle all communications and ensure their needs are met" [5]. This approach eliminates confusion by providing a single, reliable source for updates and coordination among all parties.
Use Shared Schedules and Checklists
Detailed schedules and checklists are essential for defining responsibilities across trades. For instance, installing security cameras requires mounting brackets during the framing stage, while equipment racks need dedicated, ventilated spaces planned during the architectural phase. Missing these critical steps can lead to expensive retrofits or design compromises.
A standardized Project Technology Assessment form can help document all requirements upfront and distribute them to the relevant teams [2]. This ensures that electricians plan for dedicated circuits, HVAC contractors account for cooling technology closets, and framers reinforce walls for heavy displays. By working from a shared blueprint, miscommunication is minimized.
To further streamline the process, schedule a pre-drywall walkthrough with your builder and integrator. This allows everyone to confirm equipment placements and avoid costly adjustments later [3].
When schedules and checklists are in place, potential conflicts become easier to address before they escalate.
Handle Conflicts Before They Escalate
Conflicts often arise from unclear scopes or late involvement of key players. For example, if integrators join a project after framing and electrical bids are complete, they might find that vital infrastructure has been overlooked. The Home Technology Association cautions, "if technology becomes an afterthought, it will threaten the home’s design integrity and often results in project delays, compromises, and costly change orders" [1].
To avoid such issues, define each trade’s responsibilities early in the process. Your integrator should provide detailed framing, electrical, and cooling requirements that other subcontractors can include in their initial bids. Pricing these needs upfront reduces confusion about who is responsible for tasks like low-voltage pathways or equipment ventilation. Additionally, clear documentation gives builders a reliable reference during construction, cutting down on unnecessary back-and-forth and keeping the project on track.
Step 5: Plan for Testing and Ongoing Support
Once your smart home system is installed, it’s essential to test it thoroughly to ensure everything works as expected. This step helps safeguard your investment and prevents potential headaches later on.
System Testing and Handover
Before wrapping up the project, conduct a final walkthrough with your integrator. This step ensures you’re comfortable operating the system and confirms that the installation aligns with the agreed project scope [5]. During this process, test all critical features, including local control options and fail-safe mechanisms. These are vital to keeping the system functional, even if internet connectivity or cloud services fail [3]. Additionally, confirm that processors, switches, and UPS units are housed in well-ventilated areas, as poor cooling can lead to hardware issues over time.
Many professional integrators offer ongoing support services, such as remote software updates and network health monitoring. These services not only address potential glitches but also help protect your system against cybersecurity risks without requiring in-person visits [5]. Michael Oh of TSP Smart Spaces highlights the convenience of remote support:
"If somebody says ‘I have a party coming on Friday, and I’d love to do this new scene,’ I can come in remotely and create a new scene for them… That’s sort of the magic of what we do" [6].
Once the system passes all tests, it’s a good idea to start thinking about how it can evolve with future upgrades.
Design for Future Upgrades
Since smart home technology advances rapidly, planning for future updates can save you both time and money. Installing empty conduits in ceilings, soffits, and roof edges allows you to add sensors, solar panels, or antennas later without having to tear down walls [3].
Scott Newnam, CEO of Audio Advice, emphasizes the importance of laying the groundwork early:
"When one of my clients or a friend comes to me and says ‘Hey, I’ve got a $50,000 budget. What should I get?’ the first thing I tell them is ‘Get the infrastructure right. Wire the house correctly’" [6].
Professional integrators like One Sound Choice provide not only installation but also ongoing monitoring and support to ensure your smart home remains secure and adaptable for future advancements.
Pre-Wiring vs. Retrofitting: A Comparison
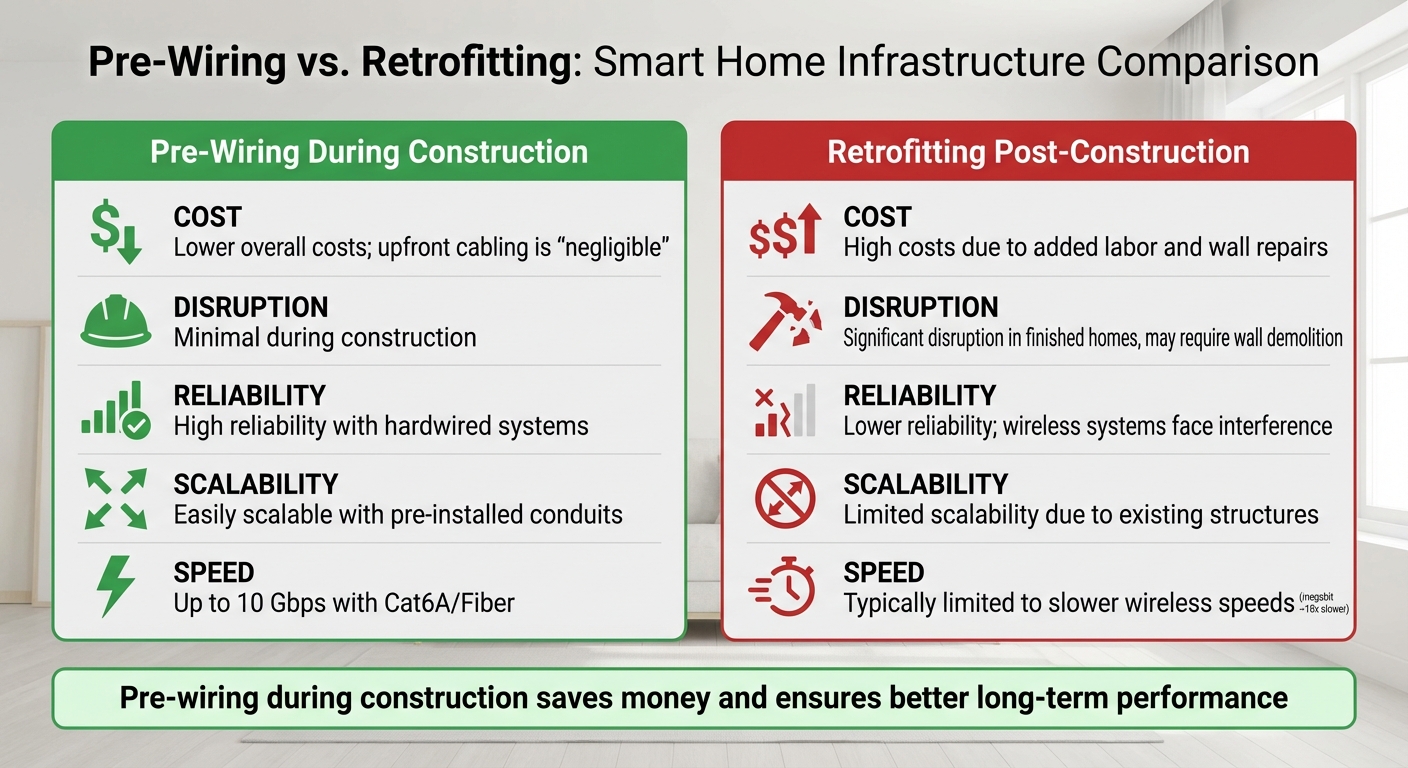
Pre-Wiring vs Retrofitting Smart Home Systems Cost and Performance Comparison
When planning a smart home, the timing of infrastructure installation plays a big role in cost, performance, and overall design. Choosing to pre-wire during construction or retrofit later can drastically affect these aspects. Pre-wiring offers a smoother process for integrating devices and achieving luxury smart home solutions. Since cables and conduits can be laid before drywall is installed, it avoids the challenges of running wires through finished walls, which is labor-intensive and costly [3][6]. As Adam Zell from Boston Automations explains:
"Coming back later to run wire is prohibitively expensive… while the up-front cost of a few runs of wire just in case is affordable" [6].
From a performance perspective, pre-wiring is a clear winner. For example, hardwired Cat6A connections can deliver speeds up to 10 Gbps, while wireless mesh systems typically operate at much slower megabit speeds – about ten times slower [4]. This speed advantage is crucial for bandwidth-heavy tasks like streaming high-definition video or managing security cameras. Alongside speed, pre-wiring also allows for more polished and integrated designs.
In terms of aesthetics, pre-wiring makes it possible to incorporate hidden equipment racks, in-wall speakers, and flush-mounted displays. Achieving this level of integration during a retrofit is nearly impossible without visible compromises or costly wall repairs [1][5]. This seamless setup not only enhances the look of your space but also contributes to the system’s long-term reliability.
Comparison Table
The table below highlights the differences between pre-wiring during construction and retrofitting after the fact.
| Factor | Pre-Wiring During Construction | Retrofitting Post-Construction |
|---|---|---|
| Cost | Lower overall costs; upfront cabling is "negligible" [6] | High costs due to added labor and wall repairs [6] |
| Disruption | Minimal during construction | Significant disruption in finished homes, may require wall demolition |
| Reliability | High reliability with hardwired systems [6] | Lower reliability; wireless systems face interference [6] |
| Scalability | Easily scalable with pre-installed conduits [3] | Limited scalability due to existing structures |
| Speed | Up to 10 Gbps with Cat6A/Fiber [4] | Typically limited to slower wireless speeds [4] |
This comparison underscores the importance of planning for smart home infrastructure early in the construction process. As Scott Newnam points out, involving an integrator from the beginning can help avoid costly mistakes down the line [6].
Conclusion
Integrating smart home technology successfully requires thoughtful planning, coordinated construction efforts, and open communication. The Home Technology Association advises that developing a technology plan before framing, electrical work, and HVAC installations can help you avoid "retrofit headaches and expense down the line" [1]. Pre-wiring during construction not only saves money but also ensures better system performance.
Start by defining your goals, aligning installations with each construction phase, and involving a qualified integrator early in the process. Clear communication and planning for final testing are also key. By following these steps, you can minimize costly changes, optimize system functionality, and create a home suited to modern living.
An experienced local integrator, such as One Sound Choice, can play a crucial role in bridging your lifestyle needs with your builder’s timeline. Their expertise ensures that low-voltage wiring, equipment spaces, and network infrastructure are thoughtfully planned and installed [5]. This is particularly important in Northern New Jersey, where homes often require advanced systems that combine security, networking, entertainment, and automation into one seamless platform.
One Sound Choice, with over 30 years of experience and more than 2,500 installations, excels at working alongside builders to implement enterprise-grade networks, security systems, whole-home audio, and smart controls from the outset. Their approach results in systems that are secure, dependable, and easy to use – enhancing daily life for families.
Proper planning and professional installation deliver long-term advantages. Homes equipped with integrated smart technology sell 33% faster and may achieve a 3% higher closing price [11]. Beyond financial benefits, you’ll enjoy a system tailored to your family’s needs, with the flexibility to adapt as technology evolves. This forward-thinking approach eliminates the hassle and cost of retrofitting, ensuring your home remains future-ready.
FAQs
Why should I involve a smart home expert during the early stages of construction?
Incorporating a smart home integrator early in the construction phase allows your home’s wiring and infrastructure to be set up with advanced technology in mind right from the beginning. This proactive approach can help you sidestep expensive modifications or delays down the line while ensuring all devices operate smoothly together.
Early planning also makes it easier to include features like whole-home audio, automated lighting, or smart security systems in a way that aligns with your home’s design and functionality. A professional integrator brings the know-how to build a system that’s dependable, user-friendly, and tailored to fit your family’s lifestyle.
Why is it important to pre-wire a home for smart technology during construction?
Pre-wiring your home for smart technology during construction sets the stage for smooth and dependable system integration. Taking this step early avoids the expense and hassle of retrofitting later on, while also preparing your home for future technological advancements. By installing advanced wiring, such as Cat6A cables, and conduits before the walls are sealed, you create a versatile infrastructure capable of adapting to new technology – all without compromising the aesthetics of your home. This forward-thinking approach not only cuts costs and saves time but also boosts the efficiency and convenience of your smart home setup.
How can I make sure my smart home system stays up-to-date with new technology?
To keep your smart home system ready for future advancements, begin with a solid foundation. Plan for wired infrastructure like Cat6A cables or fiber optics during the initial design phase. These options ensure high bandwidth and reliable performance, making it easier to handle upgrades down the road. Opt for systems that adhere to open standards such as Matter or Wi-Fi 7, as these promote better compatibility with emerging devices and technologies. Additionally, working with a professional integrator can make a big difference. They can design a system tailored to your needs, ensuring it’s scalable and providing ongoing support as technology changes. With this thoughtful preparation, your smart home will remain efficient and up-to-date for years to come.