
Struggling with slow WiFi? Whether it’s buffering during your favorite Netflix show, lagging Zoom calls, or dead zones in your home, these issues can disrupt daily life. The good news? Most WiFi problems stem from fixable issues within your home network. Here’s a quick overview of six practical solutions to boost your WiFi performance:
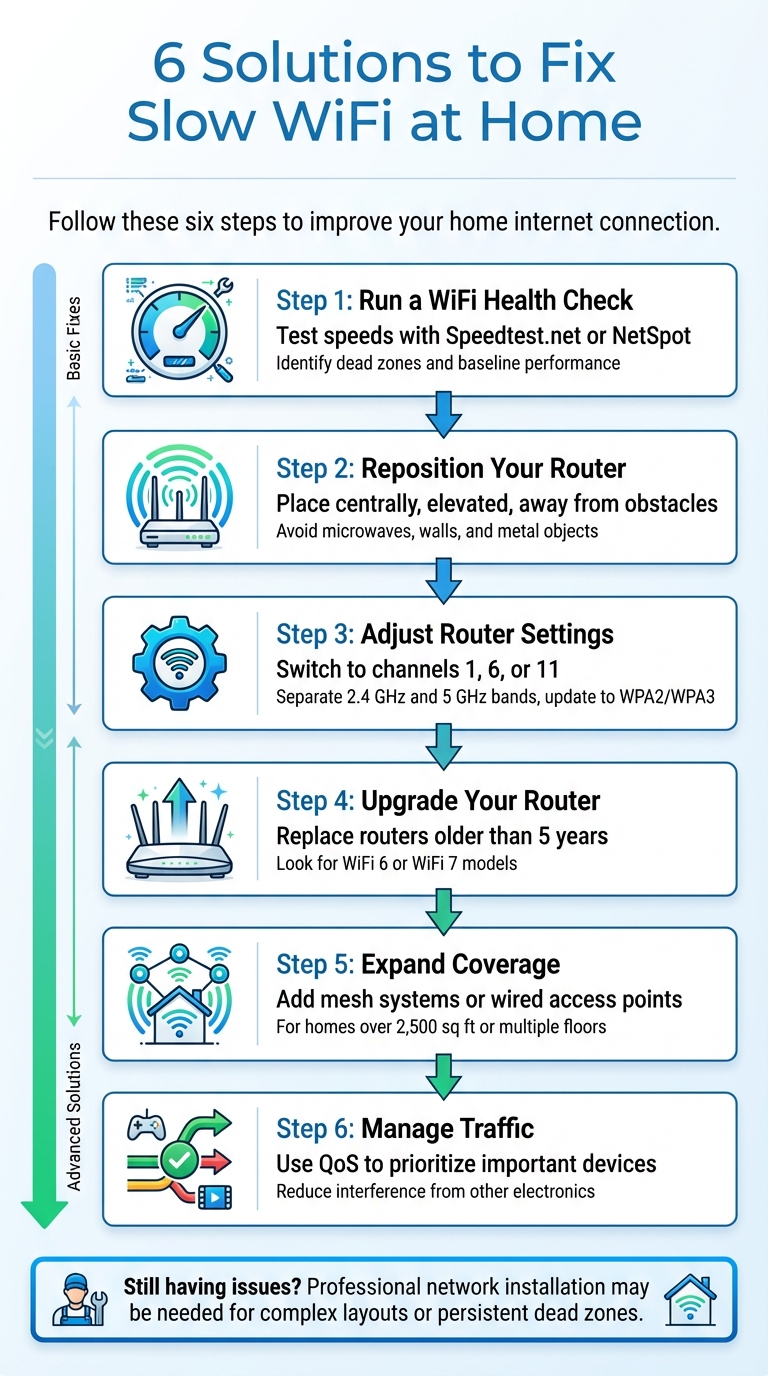
- Run a WiFi Health Check: Test speeds in different rooms and identify dead zones using tools like Speedtest.net or NetSpot.
- Reposition Your Router: Place it centrally, elevated, and away from obstacles like walls or microwaves for better signal distribution.
- Adjust Router Settings: Switch to less crowded channels, separate frequency bands (2.4 GHz, 5 GHz), and update security settings to WPA2/WPA3.
- Upgrade Your Router: If your router is over five years old, consider a WiFi 6 or WiFi 7 model for faster speeds and better capacity.
- Expand Coverage with Mesh Systems or Access Points: For larger homes or multi-level spaces, add hardware to eliminate dead zones.
- Manage Traffic and Reduce Interference: Use Quality of Service (QoS) to prioritize devices and minimize interference from other electronics.
If these fixes don’t solve your issues, professional network installations, including wired access points or custom setups, may be the answer. Start with these steps to reclaim reliable, fast WiFi at home.
6 Steps to Fix Slow WiFi at Home
5 Easy Ways To Fix Your Slow Wifi
Run a WiFi Health Check First
Before rearranging equipment or investing in upgrades, it’s crucial to figure out what’s actually causing the problem. Think of this as a checkup for your network – like diagnosing a headache before reaching for the medicine cabinet. A few straightforward tests can help you determine whether the issue lies with your ISP, router, or something else entirely. This initial step sets the foundation for more effective solutions later.
Test Speeds in Different Rooms
Start by establishing a baseline for your internet speed. Connect a laptop directly to your modem or router using an Ethernet cable and run a speed test on platforms like Speedtest.net or Fast.com [2]. This wired test shows the exact speed your ISP is delivering to your home. If the results are much lower than what your plan promises, the problem may be with your ISP or modem [7].
Next, test your WiFi speed while standing near your router. This will give you an idea of the maximum speed your WiFi setup can achieve under ideal conditions [2]. After that, walk around your home and test the speed in different rooms, paying close attention to areas where you’ve noticed slowdowns. If the speed in a specific room drops below 50% of your baseline, you’ve likely found a trouble spot [3]. From here, you can check signal strength to dig deeper.
Check Signal Strength and Find Dead Zones
While speed tests give you part of the story, signal strength measurements provide more detail. Your device’s WiFi bars offer a rough estimate, but for precise readings, free mobile apps like NetSpot, Fing, or iWiFi can measure dBm levels. For reference, –30 dBm is excellent, while anything between –70 and –80 dBm is weak and might not support reliable connectivity [8]. Walk through your home with one of these tools and observe how the signal strength changes. Concrete walls, metal ductwork, large furniture, and even aquariums can block or weaken WiFi signals [8] [4].
"The best way to diagnose a dead zone is to run a speed test."
– Joe Supan, Senior Broadband Reporter, CNET [8]
For a more visual approach, desktop tools like Ekahau‘s Heatmapper or MetaGeek‘s inSSIDer can create a color-coded map of your WiFi coverage. These maps make it easy to pinpoint exactly where your signal weakens or disappears. Knowing where the dead zones are will help ensure your devices get the coverage they need as you move forward.
Basic Troubleshooting Steps
Before making any hardware changes, start with the simplest fixes. Restart your modem and router by turning them off, waiting at least two minutes, and then powering them back on [4]. This simple step can resolve about 90% of common connectivity issues [8]. If speeds remain low, check with your ISP to see if there’s an outage in your area [4].
Additionally, make sure external factors aren’t skewing your results. For example, if you’re running a speed test with a VPN enabled, it could throttle your speeds and give you inaccurate readings [9]. If you’re using both an ISP-provided modem-router combo and your own router, ensure the ISP unit is set to "Bridge Mode" to avoid interference [5]. Finally, use a network scanner to check for unauthorized devices hogging your bandwidth [2]. These quick steps often uncover the root cause without the need for expensive upgrades.
Fix Router Placement and Settings
If you’ve pinpointed areas in your home with poor WiFi performance, a simple fix might be repositioning your router and tweaking its settings. These adjustments can often resolve slow speeds without requiring new hardware. Let’s dive into how proper placement, channel adjustments, and security updates can enhance your home network.
Where to Place Your Router
The location of your router plays a huge role in signal strength. Ideally, place it in the center of your home or wherever you use your devices the most. For multi-story houses, positioning the router near the ceiling on the first floor or on the floor of the second floor can help distribute the signal evenly across levels.
Elevation is key. Routers broadcast signals downward and outward, so placing yours on a high shelf or mounting it on a wall can minimize obstacles. Avoid hiding the router in closets or cabinets, as these block the signal. Similarly, placing it behind a TV can reduce its range by up to 60%, thanks to electronic interference and physical barriers [10].
"Proper router placement is the most cost-effective performance upgrade available. No router, no matter how advanced, can compensate for poor positioning."
– Lisa Phifer, Consultant, Core Competence Inc. [10]
Steer clear of kitchens, as microwaves and metal appliances operating on 2.4 GHz can disrupt your WiFi signal. Dense materials like concrete or reflective surfaces can also weaken the connection. Positioning the router near windows or exterior walls may waste bandwidth by sending signals outside your home. If your router has external antennas, keep them vertical; for multi-story homes, tilting one antenna at a 30-degree angle can improve coverage. These small changes can make a noticeable difference, ensuring all your devices stay connected.
Once the router is in the right spot, fine-tune the channel settings to reduce interference.
Switch WiFi Channels and Frequency Bands
Nearby networks can create channel congestion, especially on the 2.4 GHz band. Manually setting your router to channels 1, 6, or 11 – these are the only non-overlapping channels – can help improve performance [2]. You can adjust this through your router’s admin panel, typically accessed via an IP address like 192.168.1.1 or 192.168.0.1.
Each frequency band has its strengths. The 2.4 GHz band offers better range and can penetrate walls more effectively, but it’s prone to interference from devices like microwaves, baby monitors, and Bluetooth gadgets. On the other hand, the 5 GHz and 6 GHz bands are faster and less crowded but don’t cover as much distance. For high-demand devices like gaming consoles, PCs, or 4K streaming boxes, connect them to the 5 GHz or 6 GHz bands for better performance.
Some routers come with "band steering" (often called Smart Connect), which automatically shifts devices between frequency bands under one network name. While convenient, this can sometimes push devices onto the slower 2.4 GHz band. If you notice lag, consider disabling band steering and creating separate network names, such as "Home_2.4G" and "Home_5G", so you can manually assign devices to the optimal band.
"If you’re still using 2.4-GHz Wi-Fi and you’re having speed troubles, rebooting might help, since it will force the router to choose the best channel with the least interference during boot-up."
– Sandeep Harpalani, Vice President of Product Management, Netgear [1]
Update Security and Turn Off Old Protocols
Outdated security settings can leave your network vulnerable and even slow it down. Make sure your router uses WPA2 or WPA3 encryption, as older protocols like WEP are not only less secure but can also impact performance.
"If your network is open or has a weak password, you could have an unwanted guest piggybacking on your network… secure your network with a strong password and change the security protocol to WPA2 or WPA3."
– Whitson Gordon, Tech Writer, PCMag [2]
Regularly updating your router’s firmware is another critical step. Most modern routers allow you to enable automatic updates, ensuring your device stays secure and performs optimally. Also, change the default admin credentials to prevent unauthorized access. Removing unused devices from your network and scheduling off-hour reboots can help free up bandwidth, resulting in smoother connectivity for everyone in your household.
Upgrade to a Better Router
If your router has been around for more than five years, it could be holding back your entire network. Experts suggest replacing routers at least every five years, or even every two to three years if your household is packed with smart devices, streaming services, and gaming consoles [11].
When Your Router is Too Old
Routers using the 802.11n standard – or anything older – simply can’t keep up with the demands of modern homes. These older devices max out at speeds that struggle to support 4K streaming, video calls, and the simultaneous use of multiple smart devices.
"People are running into problems where Mom’s trying to do a Zoom call, but it goes south, because the kids are upstairs streaming Netflix videos. That’s one sign that you might need to upgrade your Wi-Fi network."
– Dave Coleman, Director of Wireless Networking, Extreme Networks [11]
Other telltale signs of an outdated router include overheating, frequent resets, or the need for manual firmware updates [2].
Modern Router Advantages
Today’s routers come with features designed to handle the demands of modern households. WiFi 6 and WiFi 7 technologies deliver multi-gigabit speeds, leaving older models far behind [1][2]. With MU-MIMO technology, these routers can communicate with multiple devices at the same time – perfect for families where everyone is online at once. Tri-band setups take it a step further by dedicating one frequency band exclusively for internal network communication, which ensures mesh systems don’t slow down device performance [6].
Other perks include Quality of Service (QoS) controls, which let you prioritize essential traffic like work video calls, and high-speed Ethernet ports (2.5G or 10G) that prevent bottlenecks on multi-gigabit fiber connections [6].
Why Professional-Grade Equipment Matters
Consumer-grade routers might look appealing on paper, but they often fall short when it comes to real-world performance. Professional-grade equipment, on the other hand, is built for sustained speed and reliability. These systems use larger processors and more memory to maintain high speeds over longer distances, but they also generate more heat and require better ventilation [12].
Companies like One Sound Choice specialize in designing custom network solutions tailored to your home’s layout. They install systems with features like wired backhaul for maximum stability and advanced security platforms that offer real-time protection for IoT devices [13]. Plus, professional setups often come with ongoing support, automatic firmware updates, and troubleshooting, so your network stays secure and dependable.
"No matter how fast your internet connection is, a bad Wi-Fi router will always limit its performance."
– Joe Supan, Senior Broadband Reporter, CNET [8]
With a professional-grade router, your network won’t just meet today’s needs – it’ll be ready for future smart home upgrades. These systems allow you to expand your network seamlessly with additional access points or mesh systems, ensuring stability, security, and peace of mind that consumer routers can’t match.
sbb-itb-c5b321b
Add Access Points or Mesh Networks
When One Router Isn’t Enough
Even the most powerful router has its limits, especially in larger homes. If you’re dealing with dead zones in spots like bedrooms, basements, or outdoor areas, your router might be hitting the wall – literally. Thick walls, metal ductwork, and materials like brick or concrete can block WiFi signals, leaving parts of your home disconnected [8]. For homes over 2,500 square feet or those with multiple floors, one router simply won’t cut it. That’s where additional hardware comes in to extend and strengthen your network.
Mesh Systems vs. Wired Access Points
Mesh WiFi systems are a popular solution, using multiple nodes placed throughout your home to create a single, seamless network. Unlike older extenders that require you to manually switch between networks, mesh systems automatically connect your device to the strongest signal as you move around [14]. A typical three-piece mesh system can cover up to 4,500 square feet and support over 75 devices at once [8].
Tri-band mesh systems take it a step further by dedicating one frequency band solely for communication between nodes, which keeps your devices running smoothly without slowing down [5]. For the best performance, you can connect the nodes via Ethernet – this wired backhaul eliminates the speed loss that can occur with wireless communication [2].
"Connecting the nodes with Ethernet will produce the best results (trust me: If you truly want problem-free Wi-Fi, it’s worth calling an electrician to run the wires)."
– Whitson Gordon, Contributing Writer, PCMag [2]
Wired access points, on the other hand, offer unmatched stability and speed because they connect directly to your router using Ethernet cables. They’re ideal for demanding tasks like 4K streaming, gaming, or managing a large number of devices. However, installing them often means running cables through walls or ceilings, which might require professional assistance.
Professional Network Design
Choosing the right equipment is only half the battle; proper setup is key to getting the most out of your network. Professional network designers can map your home, identify obstacles, and strategically place access points to ensure optimal coverage [2]. They use specialized tools to measure signal strength, aiming for at least -60 dBm at every node for reliable performance [15].
Companies like One Sound Choice specialize in creating custom solutions tailored to your home’s unique layout. They can integrate wired backhaul for maximum stability, set up separate networks for IoT devices and guests, and provide ongoing support to keep your system secure and ready for future upgrades. With professional-grade equipment and expert planning, you’re not just solving today’s connectivity issues – you’re building a network that’s ready for whatever comes next.
Manage Network Traffic and Reduce Interference
After optimizing router placement and upgrading your hardware, the next step to improving your network is managing traffic and cutting down interference. These strategies ensure smoother performance across all your devices.
Prioritize Important Devices with QoS
Quality of Service (QoS) is like giving VIP access to your most important devices and applications. It ensures that your work laptop doesn’t freeze during a Zoom call just because someone in the house is downloading a massive game file [2][16].
Modern routers often come with built-in QoS settings, letting you assign higher priority to specific devices – like security cameras or work computers – or even certain applications like video conferencing and online gaming [2][16]. Many routers simplify the process with one-click presets labeled "multimedia" or "gaming" [2]. For example, a single 4K Netflix stream demands 25 Mbps of bandwidth [16], so prioritizing essential devices ensures your network doesn’t buckle under heavy use during busy hours.
"Think of the quality of service feature (aka QoS, or prioritization) as priority boarding on an airplane: It determines which of your content and devices move to the head of the WiFi line."
– Nicholas De Leon, Senior Home & Tech Writer, Consumer Reports [16]
While prioritization helps maintain smooth performance, reducing interference is equally important to keep your network stable.
Reduce WiFi Interference
Your WiFi signal constantly battles interference from both physical obstacles and other electronic devices. Common household items like microwaves, baby monitors, and Bluetooth speakers can disrupt the 2.4GHz band [4][1][17]. Even large objects like fish tanks can weaken signals, as water absorbs radio waves [1][17].
To reduce interference, keep your router away from such devices and place it in a central, elevated spot for better coverage [7].
Once interference is minimized, segmenting your network can further improve performance and stability.
Separate Networks for Different Uses
Dividing your network into separate bands can help reduce congestion, improve stability, and enhance security. For instance, you can assign low-bandwidth smart devices like thermostats and door locks to the 2.4GHz band, which offers better range and wall penetration. Meanwhile, high-priority devices such as work laptops and streaming boxes should use the faster 5GHz or 6GHz bands [16][1].
Setting up a guest network is another way to maintain security and stability. It keeps visitors or IoT devices isolated from your primary network, protecting sensitive data [16][3]. Additionally, using wired connections for stationary devices like gaming consoles or desktops can free up wireless bandwidth for mobile devices [16][1].
| Band | Speed | Range | Best Use |
|---|---|---|---|
| 2.4 GHz | Slower | Longest (penetrates walls well) | Smart home devices, cameras |
| 5 GHz | Faster | Shorter | Work laptops, streaming |
| 6 GHz | Fastest | Shortest | Gaming, VR, 4K/8K video |
When to Hire a Professional Network Team
After trying everything from repositioning your router to upgrading your hardware and managing network traffic, some issues might still refuse to go away. If you’re dealing with persistent dead zones, dropped connections, or sluggish speeds, it might be time to bring in a professional.
Signs You Need Professional Help
Sometimes, DIY solutions just aren’t enough. Here are a few signs that it’s time to call in the experts:
- Stubborn Dead Zones: If certain rooms still don’t get WiFi despite your best efforts to reposition the router, structural barriers like thick walls or concrete might be interfering [18][2].
- Device Overload: If your home is packed with smart devices and you’re constantly prioritizing which ones get bandwidth, your current setup may not be able to handle the load [18][19].
- Challenging Home Layouts: Multi-story houses or homes with tricky layouts often need a professional assessment to ensure reliable, high-speed coverage throughout [18][21].
What Professional Services Include
Hiring a professional network team brings access to tools and techniques that go beyond what you can do on your own. For instance, they use WiFi heatmapping to identify interference and optimize signal coverage [22][23]. They also conduct site surveys to pinpoint problem areas and install wired access points using CAT6 or fiber cables for consistent, high-speed connections [23]. Advanced tools like RF modeling help minimize design errors that often occur with DIY setups [22].
"If you truly want problem-free Wi-Fi, it’s worth calling an electrician to run the wires."
– Whitson Gordon, Contributing Writer, PCMag [2]
Professional installations typically take 30 minutes to two hours, depending on your home’s complexity [21]. These services often include configuring Quality of Service (QoS) settings, creating separate networks for different device types, and setting up modern security protocols like WPA3 [18]. Many professionals also offer maintenance packages, which include firmware updates and ongoing troubleshooting to keep your network running smoothly [18][20].
These advanced solutions are key to ensuring a reliable and personalized network setup, like the ones provided by One Sound Choice.
How One Sound Choice Builds Home Networks

One Sound Choice takes a family-first approach to home networking, combining professional-grade execution with customized design. With over 30 years of experience and more than 2,500 installations across Northern New Jersey, they specialize in creating networks that meet your unique needs. Their use of enterprise-level equipment and properly installed wired infrastructure eliminates common issues like dead zones.
Led by Ryan "The Smart Guy" Herd, the team offers long-term support that goes far beyond what DIY solutions can provide. When problems arise, their experts – who know your system inside and out – are ready to troubleshoot remotely or visit your home. This hands-on, trusted-advisor approach ensures your network evolves as your family’s needs change, all without the stress of managing it yourself.
Conclusion: 6 Ways to Fix Slow WiFi
What You Need to Remember
Fixing slow WiFi starts with figuring out what’s causing the problem. Start by running speed tests with tools like Ookla or Fast.com to measure your connection. Pair this with WiFi analyzer apps like Fing or Netspot to check for dead zones or interference. To rule out your Internet Service Provider (ISP) as the issue, connect a laptop directly to your modem using an Ethernet cable. If speeds are still sluggish, it’s likely an ISP problem.
Once you’ve pinpointed the issue, simple tweaks can often make a big difference. Place your router in a central, elevated spot and adjust its antennas – horizontal positioning can improve coverage across multiple floors. Switching to less crowded channels and updating your router’s firmware can also enhance performance and security.
If your router is outdated (more than five years old), it’s time for an upgrade. Look for models that support Wi-Fi 6, 6E, or 7 for better speeds and capacity. For larger homes or multi-level spaces, a mesh WiFi system can provide consistent coverage where a single router falls short. Additionally, take advantage of Quality of Service (QoS) settings to prioritize important tasks like video calls or gaming.
When basic fixes don’t cut it – whether due to structural obstacles like concrete walls or the need to support dozens of connected devices – professional help might be the answer. Experts use tools like WiFi heatmapping and can install wired access points with CAT6 or fiber cables to ensure fast, reliable connections throughout your home. Companies like One Sound Choice specialize in creating professional-grade networks for families in Northern New Jersey, offering tailored solutions and ongoing support.
From quick adjustments to full-scale upgrades, the best approach depends on your home’s layout and your device needs. Start with the basics, invest in upgrades as needed, and don’t hesitate to bring in professionals for more complex challenges.
FAQs
How do I find and fix WiFi dead zones in my home?
If you’re dealing with WiFi dead zones in your home, here’s how to track them down and improve your coverage. Start by walking around with your smartphone or laptop, checking the signal strength in different areas. For a more precise approach, use a WiFi analyzer app to identify spots with weak or no signal.
To address these dead zones, begin by relocating your router to a central, open spot. Keep it away from walls, metal objects, and devices like microwaves that can interfere with the signal. Ensure your router’s firmware is updated, and consider switching to a less-crowded channel or the 5 GHz band for stronger performance. If weak spots persist, investing in a mesh WiFi system or a range extender can help maintain a steady connection throughout your home.
What advantages do Wi-Fi 6 and Wi-Fi 7 routers offer for your home network?
Upgrading to a Wi-Fi 6 or Wi-Fi 7 router can transform your home network with faster speeds, reduced lag, and improved reliability. These routers are built to support multiple devices simultaneously, making them perfect for homes packed with smart gadgets.
Wi-Fi 7 steps things up even more, delivering higher data rates and better performance in busy network environments, all while remaining compatible with older devices. If your current Wi-Fi feels sluggish or struggles to meet today’s demands, switching to one of these routers could be just what you need.
When should I hire a professional to set up my home network?
You might want to think about bringing in a professional network installer when your setup involves more than just plugging in a simple router. This becomes especially crucial if you have a large home, multiple floors, or a new build where Ethernet cables need to be routed through walls. A professional can ensure your router is placed in the best spot, design a mesh network for better coverage, and make sure your connection can handle bandwidth-heavy tasks like 4K streaming, video calls, and managing smart home devices.
Experts are also invaluable for more complex setups, such as structured cabling, wall-mounted access points, or integrating with smart home systems. They can prepare your network to handle faster internet speeds and additional devices down the line, saving you time and sparing you potential frustrations.
If you’re dealing with wiring uncertainties or struggling with sluggish performance despite paying for high-speed internet, a professional can diagnose and resolve these issues. By investing in expert help, you’re setting yourself up for a network that’s reliable, secure, and ready to grow with your needs.