
Wi-Fi issues can be frustrating, but they’re often caused by interference. Here’s how you can quickly identify and address common problems:
- What causes interference? Overlapping Wi-Fi channels, household devices like microwaves or baby monitors, and physical barriers (e.g., concrete walls or mirrors) can disrupt signals.
- Signs of interference: Slow speeds, dropped connections, buffering, or dead zones in your home.
- Why it matters: Interference lowers your signal quality, making streaming, remote work, and smart devices unreliable.
To fix these issues, use tools like Wi-Fi scanners or spectrum analyzers to pinpoint interference sources. Optimize your network by switching channels, creating heatmaps, or upgrading your router. For more complex problems, professional help may be needed.
Take action now to improve your Wi-Fi performance!
Identify Wifi Interference: A Chanalyzer Tutorial

Tools for Diagnosing Wi-Fi Interference
When your Wi-Fi connection falters, diagnostic tools can help uncover the culprits – whether it’s a neighboring router or a household gadget. Wi-Fi scanners focus on 802.11 traffic, while spectrum analyzers dive deeper, detecting all radio frequency activity, including non-Wi-Fi devices that traditional scanners can’t see. Here’s a breakdown of tools designed to address both Wi-Fi-specific and broader interference issues.
Wi-Fi Scanners and Heatmapping Software
To get a clear picture of your Wi-Fi environment, start with a reliable scanner. Tools like NetSpot (rated 4.8/5 by 969 users) offer two modes: Inspector Mode provides real-time data on SSIDs, channels, and signal strength, while Survey Mode overlays signal-to-noise ratio (SNR) and signal-to-interference ratio (SIR) data onto your floor plan for easy visualization [1][8]. Another option, AirMagnet, maps signal strength, noise, and SNR directly onto your layout to help identify dead zones [3]. These tools are essential for distinguishing between co-channel interference (multiple networks crowding the same channel) and adjacent-channel interference (signal spillover from nearby channels) [1].
Spectrum Analyzers for Non-Wi-Fi Sources
Wi-Fi scanners are powerful, but they can’t detect everything. For that, spectrum analyzers step in. These tools identify any radio frequency activity in a given band, including non-Wi-Fi devices like microwaves, baby monitors, and Bluetooth gadgets, which standard scanners overlook [7]. The Ekahau Sidekick pairs hardware with an app to identify 11 common interference sources by their unique patterns – microwaves, for instance, show up as wideband interference, while baby monitors appear as frequency hoppers [2]. Another option, Wi-Spy with Chanalyzer, displays interference patterns on a two-dimensional graph, with frequency on the horizontal axis and signal strength (in dBm) on the vertical [7]. Some advanced models even come with directional antennas, making it easier to physically locate rogue signals [10].
Router Logs and Mobile Apps
Your router itself can be a valuable diagnostic tool. Many routers include built-in logs and mobile apps – like AT&T Smart Home Manager – that monitor channel usage and connected devices [9][5]. These logs can reveal patterns of channel congestion and pinpoint weak spots in your network. For more advanced analysis, tools like Ekahau Analyzer can detect hidden clients and even support the latest Wi-Fi 7 and 6 GHz bands [12]. If your connection seems to drop at the same time every day, these tools can help determine whether interference is to blame or if there’s another issue at play.
How to Diagnose Wi-Fi Interference at Home
Diagnosing Wi-Fi interference at home involves three key steps: running a network scan, creating visual heatmaps, and identifying specific sources of interference.
Run an Initial Network Scan
Interference in your Wi-Fi can stem from overlapping channels or everyday household appliances. Start by accessing your router’s admin portal. Open a web browser and type in the IP address found on your router or its manual. Use the credentials provided with the router to log in. Once inside, navigate to sections like "Wireless Settings" or "Channel Information" to identify which channels your router is using and how many neighboring networks are competing for the same space [5].
If your router supports multiple frequency bands – 2.4 GHz, 5 GHz, and the newer 6 GHz (for Wi-Fi 6E or 7) – check all of them. For the 2.4 GHz band, stick to channels 1, 6, or 11 to avoid overlap [1][13]. Android users can use free Wi-Fi analyzer apps to find the best channel and view real-time signal graphs [5].
Pay attention to metrics like SNR (Signal-to-Noise Ratio) and dBm (signal strength). Aim for an SNR above 25 dB and a signal strength better than -67 dBm for optimal performance. SNR measures your Wi-Fi signal against background noise from sources like microwaves, while SIR (Signal-to-Interference Ratio) compares your signal to that of other devices like neighboring Wi-Fi or Bluetooth [8]. A signal strength above -67 dBm is ideal for streaming and video calls, while -70 dBm is the minimum for basic web browsing [6][3]. It’s worth noting that even a small 3 dB increase in background noise can reduce Wi-Fi 6E speeds by about 30% [8].
Once you’ve gathered this data, you can take the next step: creating a visual representation of your signal strength.
Create Wi-Fi Heatmaps
Heatmaps turn your scan data into a clear visual layout. Using tools like NetSpot (highly rated by users), upload or sketch a floor plan of your home, then walk through each room with your device running the software [1][5]. Stop at key spots to record signal strength, noise levels, and SNR data [1][3].
The heatmap will use colors to show where your Wi-Fi signal is strong (red and orange) and where it’s weak or nonexistent (blue and green). Dead zones often appear behind concrete walls, near metal objects, or in rooms far from the router [5][4]. For example, in a documented office scenario, a heatmap revealed a significant dead zone caused by a co-channel clash. By repositioning the main access point and switching from a single 160 MHz channel to two non-overlapping 80 MHz channels, the issue was resolved. Post-adjustment surveys showed improved SIR values and better overall performance [8].
Find Specific Interference Sources
With your scan and heatmap in hand, you can pinpoint the exact factors affecting your Wi-Fi. If you notice strong signals paired with poor SNR, the issue might be non-Wi-Fi interference from devices like microwaves or cordless phones [1][4]. Match network drops to specific activities – if the Wi-Fi cuts out during lunch, the microwave could be the culprit; if it fails during phone calls, check cordless phones [1][2]. A spectrum analyzer can help you identify raw radio frequency transmissions from these devices [13][3].
Physical barriers also play a role. Wood and drywall cause minimal interference, but concrete walls, brick, mirrors, and metal objects can significantly weaken your signal [4]. Even water, such as in an aquarium, can block Wi-Fi [4]. If your heatmap shows signal drops near barriers, try moving your router to a higher position, like a desk or shelf, and keep it away from metal objects or mirrors [1][4]. For routers with multiple antennas, positioning one vertically and another diagonally can improve coverage across multiple floors [1].
"A client can be right next to an AP with excellent signal but be unable to keep a connection if the signal from another Wi-Fi or any other type of radio-frequency device is too great." – Eric Geier, Contributing Writer, Network World [3]
In densely populated areas like apartment buildings, narrowing your channel width from 40 MHz to 20 MHz can help reduce interference [1]. If congestion persists on the 2.4 GHz band, move devices to the 5 GHz or 6 GHz bands. Most household interference occurs on 2.4 GHz, so this simple switch can often resolve issues quickly [1][2]. Addressing these sources not only boosts your Wi-Fi speed but also ensures your smart home devices work seamlessly.
sbb-itb-c5b321b
Testing and Confirming Your Findings
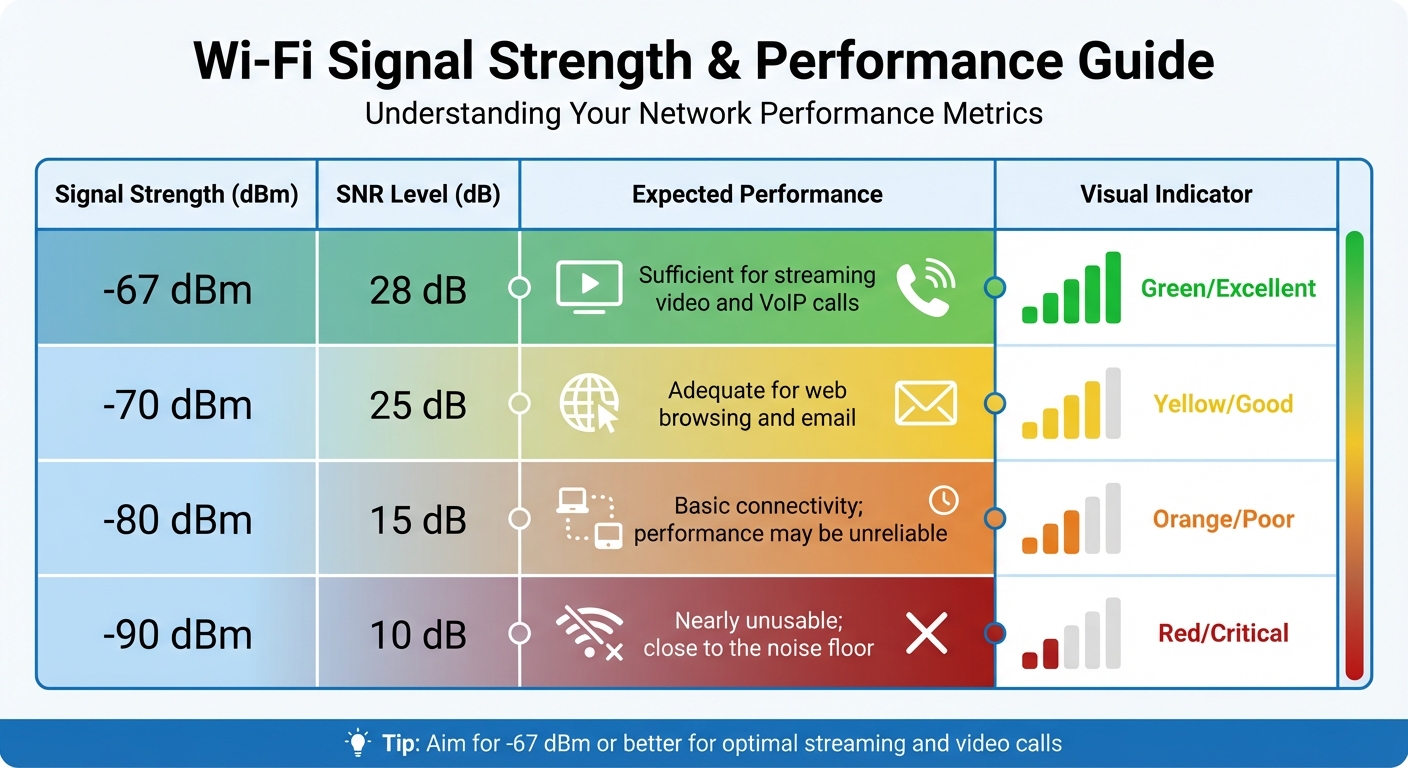
Wi-Fi Signal Strength and Performance Guide: dBm vs SNR Levels
It’s essential to verify your observations through practical testing to separate recurring issues from one-off glitches.
Run Speed Tests in Different Rooms
Start by connecting a device directly to your router using an Ethernet cable and running a speed test on Speedtest.net. This will give you a baseline for your ISP’s maximum speed [1].
Next, perform speed tests in various rooms. If you notice strong signal strength (around -50 to -60 dBm) but experience unstable speeds or frequent video call interruptions, Wi-Fi-to-Wi-Fi interference might be the culprit [1].
Be sure to test at different times of the day, as network congestion – especially during peak evening hours – can influence performance [1]. If speeds drop significantly when using devices like microwaves or cordless phones, you might be dealing with interference from non-Wi-Fi sources [1][2].
| Signal Strength | SNR Level | Expected Performance |
|---|---|---|
| -67 dBm | 28 dB | Sufficient for streaming video and VoIP calls [6] |
| -70 dBm | 25 dB | Adequate for web browsing and email [6] |
| -80 dBm | 15 dB | Basic connectivity; performance may be unreliable [6] |
| -90 dBm | 10 dB | Nearly unusable; close to the noise floor [6] |
If your speed tests reveal inconsistencies, it’s time to dig deeper by analyzing your router’s logs.
Review Router Logs
Log into your router’s admin portal and access its logs, often labeled as "System Log", "Event Log", or "Status." These logs can provide valuable insights into network activity. Look for high rates of retransmissions or packet loss, which often signal interference disrupting your signal before it reaches its destination [1].
Pay attention to entries like CRC errors, PHY errors, or frequent "Channel Change" events – these indicate that interference is damaging your data frames [1][5]. If you see repeated device disconnections (disassociation events) without any manual disconnection, it points to severe instability caused by external interference [4]. Cross-referencing these log entries with the times you noticed issues can help confirm a pattern of interference.
When to Call a Professional
If you’ve tested and logged your network’s performance but still face persistent issues, it might be time to consider professional help. When simple fixes like changing channels or repositioning your router don’t solve the problem, the interference could be more complex. These situations often require specialized tools and expertise to properly diagnose and resolve the issue [11][17].
Benefits of Professional Network Solutions
Basic consumer tools often fall short when it comes to detecting certain types of interference. For instance, power line noise, faulty hardware causing electrical arcing, and radar transmitters can all create interference that requires professional-grade spectrum analysis to identify [14][16]. Additionally, homes built with materials such as metal sheeting, concrete blocks, brick, or radiant heat flooring can absorb Wi-Fi signals in ways that standard mesh systems can’t effectively handle [17].
In areas where overlapping signals congest the network, professionals use real-time spectrum analyzers to pinpoint noise floor issues [14][15]. They also understand that signal strength below -80 dBm leads to severe instability, even if your device shows a connection [15]. To address these challenges, professionals can implement enterprise-grade solutions like ceiling-mounted access points, structured cabling, and precise adjustments to transmit power levels, ensuring minimal co-channel interference [19][21].
Professionals also help avoid common pitfalls. For example, adding too many access points can actually degrade performance. Did you know that three access points with four SSIDs each can use up 10% to 25% of available airtime just broadcasting their presence? [19]. Certified experts know when to reduce power on overlapping access points to encourage better device roaming, rather than inadvertently creating more interference. This level of expertise can make a huge difference.
How One Sound Choice Can Help

With three decades of experience, One Sound Choice specializes in solving interference problems that consumer-grade tools can’t detect. Their team uses cutting-edge equipment like enterprise-level spectrum analyzers and AI-powered heatmapping software to identify both Wi-Fi and non-Wi-Fi interference sources [18][21].
Under the leadership of Ryan "The Smart Guy" Herd, One Sound Choice designs custom network solutions tailored to your home’s specific architecture. They address issues like RF shadows caused by heating ducts, steel beams, or metallic-coated glass by strategically placing ceiling-mounted access points with proper channel isolation [19][20]. Their professional-grade systems ensure reliable connectivity for critical needs like home offices, video calls, and smart home integrations – all backed by top-notch post-installation support.
Conclusion
Start by performing an Ethernet speed test to figure out if the problem lies with your internet service provider (ISP) or your wireless network [22][23]. Next, check your Wi-Fi signal strength using established benchmarks [6], create a Wi-Fi heatmap to identify dead zones, and look for potential sources of interference [18][21].
After analyzing your network, make adjustments to improve performance. Place your router in a central, elevated spot and switch to less crowded channels – on a 2.4 GHz network, channels 1, 6, or 11 are typically the best options [21][23]. Keep your router’s firmware up to date, and if you’re in a high-traffic environment, consider upgrading to Wi-Fi 6 or Wi-Fi 7 for better performance [23]. If these steps don’t resolve the issues, you may need to dig deeper.
For more complicated problems, consumer-grade tools might not be enough. Issues like RF shadows caused by heating ducts [20] or Low-E glass, which can block up to 97% of Wi-Fi signals [19], often require specialized diagnostic equipment. In these cases, reaching out to professionals like One Sound Choice could save you time and hassle. With over 30 years of experience and advanced tools, they can tackle issues that standard apps simply can’t detect.
Whether you decide to handle these steps on your own or bring in experts like One Sound Choice, taking action now ensures your network can handle the demands of remote work, streaming, and smart home automation. A reliable home network is essential for keeping up with today’s connected lifestyle.
FAQs
How can I tell if my Wi-Fi problems are caused by interference or my internet provider?
If you’re dealing with Wi-Fi problems and trying to pinpoint the cause, start by testing your internet connection. Use a wired device or run an online speed test. If the results align with the speeds your internet provider (ISP) promises, the issue is likely with your Wi-Fi setup. However, if the connection remains slow, the problem might be on your ISP’s end.
Another crucial step is to check your Wi-Fi signal strength. A strong signal typically measures around -30 dBm, while a weak one hovers near -90 dBm. Several everyday devices and factors can interfere with your Wi-Fi, such as microwaves, cordless phones, Bluetooth gadgets, and even other nearby Wi-Fi networks. Identifying and reducing these sources of interference can make a noticeable difference in your connection quality.
What can I do if changing Wi-Fi channels doesn’t fix interference issues?
If changing the channel doesn’t fix the interference, try restarting your router and double-checking that its antenna is firmly connected. It’s also a good idea to place the router away from devices that commonly cause interference, like microwaves, cordless phones, or other gadgets operating on the 2.4 GHz band. To pinpoint weak spots in your home’s Wi-Fi coverage, you can use a Wi-Fi analyzer tool.
For improved coverage, you might want to look into upgrading to a mesh Wi-Fi system or adding extra access points. These options can help eliminate dead zones and ensure a more stable connection throughout your home.
When should I hire a professional to fix Wi-Fi interference at home?
If you’ve already tried the basics – like repositioning your router, minimizing interference from devices like microwaves or cordless phones, or tweaking your Wi-Fi channels – but your connection issues persist, it might be time to bring in an expert. More complex problems, such as RF shadows, tricky home layouts, or the need for multiple access points, often require specialized tools and know-how.
Professionals, like One Sound Choice, can conduct a thorough site survey to pinpoint interference sources and craft a custom Wi-Fi setup designed specifically for your home. With their expertise, you can enjoy a network that’s fine-tuned for smooth, reliable connectivity, even in challenging setups.