
Creating a VR-ready gaming room isn’t just about setting up equipment – it’s about designing a space that ensures safety, comfort, and smooth performance. Here’s a quick guide to the essentials:
- Space Requirements: For room-scale VR, aim for at least 6.5 x 6.5 feet of clear space with ceilings over 6.5 feet high. Larger spaces (e.g., 8.2 x 8.2 feet) are better for active games.
- Safety Setup: Remove obstacles, cover reflective surfaces, and use tactile floor markers to define boundaries. Padded flooring and secured cables reduce risks.
- Lighting: Use balanced, diffuse lighting to avoid tracking issues. Block natural sunlight to protect sensors and lenses.
- Airflow: A fan helps manage heat and reduces lens fog during extended sessions.
- Hardware: Ensure your gaming PC has a powerful GPU (e.g., RTX 3060 Ti or better) and at least 16GB of RAM. Properly mount tracking equipment for accurate performance.
- Audio: High-quality headphones or surround sound systems enhance immersion.
For those in Northern New Jersey, professional services like One Sound Choice can handle installation, from cable management to custom audio setups, ensuring a reliable and immersive experience.
VR Gaming Room Space Requirements by Play Style
Setting Up a VR Zone? What Works, What’s Tricky & Pro Tips! (ENG, FR, DE SUBS)
sbb-itb-c5b321b
1. Space Planning: Room Size and Layout
Selecting the right custom gaming room for your VR setup is crucial to ensure both immersive gameplay and safety. The room’s size and layout should align with the type of VR experiences you plan to enjoy, whether it’s seated simulators or room-scale adventures. Here’s a breakdown of the space requirements and layout considerations for different VR play styles.
1.1 Minimum Room Size and Ceiling Height
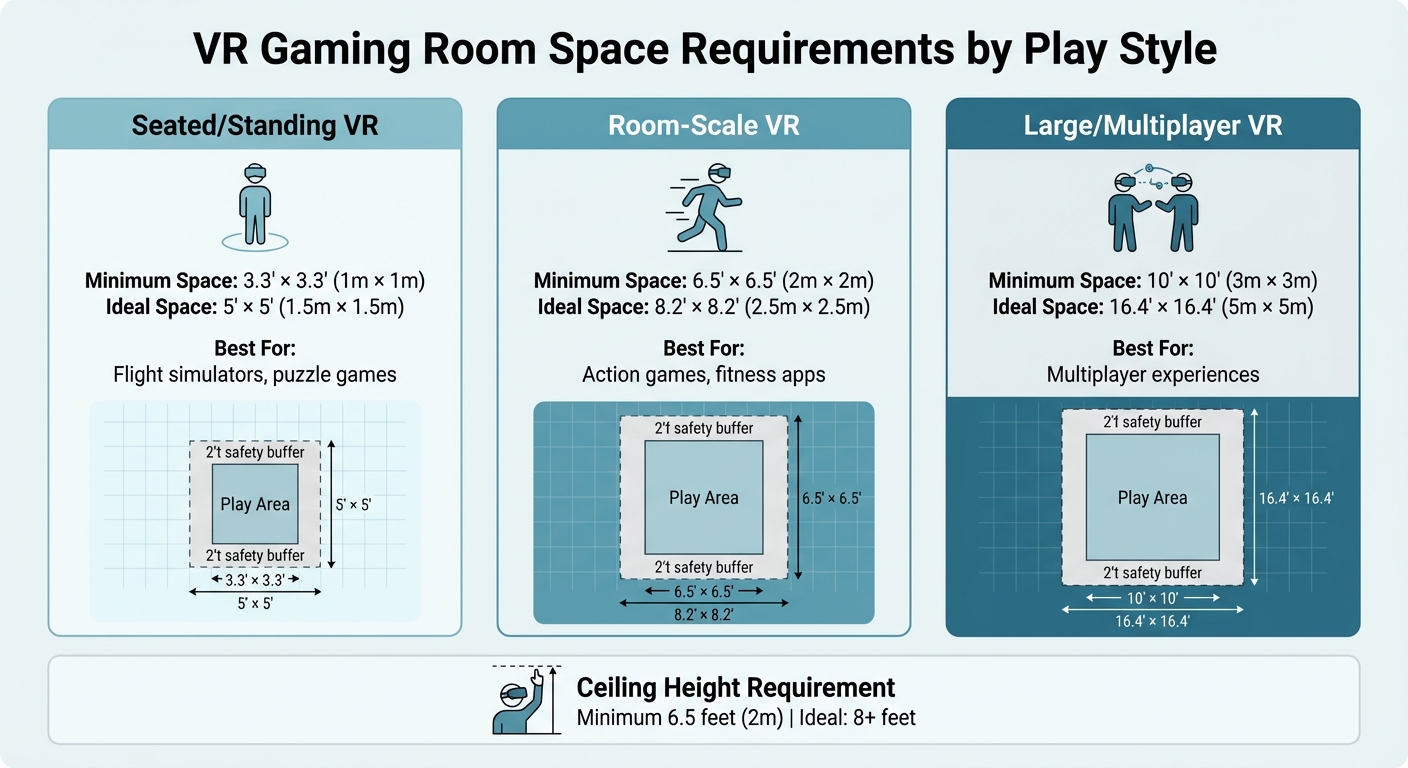
For seated or standing VR experiences, such as flight simulators or puzzle games, you’ll need at least 3.3 feet by 3.3 feet (1 meter by 1 meter) of space. This allows for comfortable arm movements and turning in place without needing to walk around [1][7]. If you’re venturing into room-scale VR, which involves physical walking and free movement, the minimum space requirement increases to 6.5 feet by 6.5 feet (2 meters by 2 meters) [1][3]. Space.com notes:
"A 2 m by 2 m square is often considered the minimum space requirement" [3].
For high-energy games, such as boxing or fitness apps, a slightly larger area – 8.2 feet by 8.2 feet (2.5 meters by 2.5 meters) – is recommended for more freedom of movement [1][7].
Ceiling height is another important consideration. A minimum height of 6.5 feet (2 meters) is necessary to avoid hitting overhead fixtures, but an eight-foot ceiling or higher is ideal for games involving overhead motions, like throwing or reaching [7]. To ensure there are no obstacles, stand in the center of the room and extend your arms fully in all directions to check for ceiling fans, light fixtures, or beams [3].
| VR Play Style | Minimum Space Required | Ideal Space Recommended |
|---|---|---|
| Seated / Standing | 3.3′ x 3.3′ (1m x 1m) [1] | 5′ x 5′ (1.5m x 1.5m) |
| Room-Scale | 6.5′ x 6.5′ (2m x 2m) [1][3] | 8.2′ x 8.2′ (2.5m x 2.5m) [7] |
| Large / Multiplayer | 10′ x 10′ (3m x 3m) [1] | 16.4′ x 16.4′ (5m x 5m) [7] |
1.2 Creating a Clear Play Area
Once you’ve determined the appropriate room size, the next step is to create a safe, obstacle-free play area. Start by removing or securing all furniture, such as chairs, tables, and lamps, to clear the zone [1]. Even small objects can pose a risk when you’re fully immersed in gameplay and making energetic movements.
It’s also wise to maintain a 2-foot (0.6 meter) safety buffer between your VR headset’s play boundary (often called the "Guardian" system) and any physical walls or furniture [7]. This buffer helps prevent accidental collisions during intense gameplay. To minimize distractions, cover mirrors and windows with curtains or matte fabrics to avoid signal reflections and controller tracking issues [1][9].
Adding a small textured rug or VR mat in the center of the play area can be very helpful. Feeling the edges of the mat with your feet provides a tactile warning that you’re nearing the boundary, allowing you to stay immersed without removing the headset [1][8]. For added safety, some users place interlocking foam tiles with different textures at the room’s edges, creating a "warning track" similar to those on sports fields [1][2].
2. Safety and Environment Setup
After setting up your VR space, the next step is to ensure it’s free from hazards that could lead to injuries or interruptions during gameplay. Even in a familiar room, objects can turn into unexpected obstacles when you’re fully immersed in a headset. Taking these precautions will help create a safe and enjoyable experience.
2.1 Removing Reflective and Breakable Objects
Reflective surfaces, such as mirrors, windows, glass-fronted cabinets, large monitors, or glass-top tables, can interfere with infrared tracking. To avoid this, cover them using blackout curtains, blinds, or non-reflective materials. Additionally, remove fragile items like vases, lamps, picture frames, and electronics from the play area. Overhead fixtures should also be secured, ensuring a clearance of at least 6.5 feet [1].
For furniture with sharp edges near the play area, consider adding padding to reduce the risk of injury. As Maria Jose Meneses, a Marketing Specialist at Porch, explains:
"As you get more comfortable, you’ll naturally push the boundaries of your space… you’ll be so happy that past you padded those corners" [2].
2.2 Flooring and Cable Organization
The type of flooring in your VR area matters. Interlocking foam tiles or low-pile padded carpets are excellent choices as they provide cushioning for falls, protect your joints, and help reduce noise [1].
To prevent tripping hazards, organize cables carefully. Ceiling-mounted retractable pulleys work well for headset cables, but if ceiling mounting isn’t an option, use heavy-duty floor covers and adhesive clips to secure them. For base station power cables, Velcro ties or wall clips can keep everything tidy and out of the way [1].
3. Lighting and Air Circulation
After setting up a safe and organized play area, the next step is ensuring the environment supports both sensor accuracy and player comfort. Proper lighting and airflow are key to enhancing sensor performance and making extended VR sessions more enjoyable.
3.1 Lighting for Sensor Performance
VR sensors rely on balanced, diffuse lighting to function effectively. Uneven or overly bright lighting can interfere with sensor tracking, distorting the room’s features and causing glare that disrupts gameplay [1]. Using diffuse LED or daylight bulbs offers a practical solution for maintaining even lighting.
Natural sunlight, while pleasant, can create complications. It disrupts infrared tracking and may damage headset lenses, leading to clarity issues [4]. As Virtual Reality Source explains:
"Natural light might feel nice, but it can wreak havoc on VR sensors. Consider using room-darkening curtains or adjustable lighting to set the mood just right" [4].
For artificial lighting, indirect LED sources or dimmable daylight bulbs work best. Position them to minimize harsh shadows and avoid directly illuminating the play area. These adjustments complement your safety setup and enhance the overall VR experience.
3.2 Cooling and Air Movement
Extended VR sessions can generate significant body heat, and headsets often trap warmth against your face. A strategically placed fan that directs airflow toward the center of the room can help cool you down, reduce lens fogging, and even provide a subtle physical cue that aids orientation and reduces motion sickness [1].
Good airflow also prevents condensation from forming on the lenses during intense or prolonged use. By integrating proper ventilation and cooling into your gaming room design, you can maintain comfort and performance, allowing for longer and more immersive play sessions.
4. Hardware and Technology Checklist
Once you’ve ensured your space is well-lit and ventilated, it’s time to focus on the technology that brings your VR experience to life. The right hardware is key to achieving smooth performance, accurate tracking, and immersive sound.
4.1 Tracking Equipment and Play Boundaries
VR tracking systems generally fall into two categories: inside-out tracking (using built-in cameras on headsets like the Meta Quest 3) and external tracking (relying on base stations, such as with the Valve Index or HTC Vive) [1][5]. For external tracking setups, base stations should be mounted in opposite corners of the room, ideally at a height of 6.5 feet (2–2.5 meters), angled downward for maximum coverage [1][7]. Keep the base stations within 16 feet of each other to maintain effective tracking [5][6].
When setting up virtual safety boundaries (like Guardian or Chaperone systems), it’s recommended to position them about 2 feet inside your actual walls. This creates a safety buffer to help prevent accidental collisions during gameplay [7][5]. Adding tactile floor markers, as discussed in section 1.2, can further assist with orientation while in VR.
Now, let’s ensure your gaming PC is up to the task of supporting VR.
4.2 VR-Capable Gaming PC
A powerful gaming PC is a must for VR, with the graphics card (GPU) being the most critical component. This is because VR systems render two high-resolution displays simultaneously, requiring substantial processing power. As PC Build Advisor puts it:
"VR gaming demands significantly more processing power than traditional gaming because your system renders two high-resolution displays simultaneously while maintaining high frame rates to prevent motion sickness" [12].
At a minimum, your PC should have a GPU with at least 8GB of VRAM – though 12–16GB is preferable – along with 16GB of RAM and an NVMe SSD capable of speeds exceeding 3,500 MB/s [10][11]. For entry-level VR, an RTX 3060 Ti performs well, while an RTX 4080 or 4090 is ideal for high-end setups. If you’re streaming VR wirelessly from your PC, connect it to your router using an Ethernet cable to reduce latency [11][12].
4.3 Audio System Integration
With tracking and computing sorted, the final piece of the puzzle is immersive audio. High-quality sound adds depth to the VR experience by providing directional cues and enhancing spatial awareness. Noise-canceling headphones are great for blocking out distractions and ensuring precise sound placement [1][2]. For extended play sessions or social gaming, consider a surround sound system. Adding acoustic treatments to your walls can help reduce echoes and improve sound clarity. Some headsets, like the Valve Index, come with built-in audio systems for added convenience [6][12].
For specialized setups, such as racing or flight simulations, you might explore cockpit seats equipped with built-in speakers and vibration motors. These can elevate sensory feedback, making the experience feel even more realistic.
If you’re in Northern New Jersey and want a professional-grade VR gaming room, One Sound Choice specializes in designing and installing complete gaming environments. With over 30 years of experience and more than 2,500 installations, their team handles everything – from enterprise-level Wi-Fi 6E networks to custom audio solutions – ensuring a seamless and immersive gaming experience. Visit onesoundchoice.com to learn more.
5. Working with Professional Installers
Partnering with professional installers can transform a basic VR gaming room into a well-designed space that prioritizes safety, performance, and durability.
5.1 Custom Design and Installation Services
Professional installers approach VR gaming rooms as integrated systems, crafting setups tailored to your specific room dimensions. They ensure the space meets the recommended minimum play area of 6.5 x 6.5 feet, allowing for comfortable and safe gameplay [5].
This process involves precise placement of tracking equipment, following the guidelines outlined in section 4.1, and implementing efficient cable management solutions. For example, ceiling-mounted pulley systems keep wires off the ground, enabling full 360° movement without the risk of tangling [5].
One Sound Choice offers a comprehensive range of services, from setting up enterprise-grade Wi-Fi 6E networks to integrating custom audio systems and advanced lighting controls. These elements are designed to work together seamlessly. For a more complex VR gaming room, the installation process typically takes 2–3 days [13]. This professional setup lays the groundwork for a reliable and high-performing system, a topic further explored in the next section.
5.2 Ongoing Support and System Updates
Beyond the initial setup, professional installers provide continuous support to keep your system secure, updated, and running smoothly. This includes automated software updates and regular recalibrations to maintain precise tracking [13][14].
Many services also offer centralized software management, which automates game updates and handles license management through a single device. This eliminates the hassle of manually updating each headset [14]. For spaces with heavy usage, installers can arrange business-grade warranty services to ensure hardware remains protected [14].
One Sound Choice adopts a trusted-advisor approach, offering local expertise to address technological changes or unexpected issues. This ensures your VR gaming room remains a valuable part of your household for years to come. To learn more or schedule a consultation, visit onesoundchoice.com.
Conclusion
Creating a VR-ready gaming room requires thoughtful planning, attention to safety, and the right technology setup. Proper space allocation and sensor placement are key to ensuring both safety and optimal performance. For example, mounting sensors at a height of 6.5 feet helps avoid dead zones, while addressing reflective surfaces and managing cables keeps the environment safe and functional. Adequate lighting and ventilation further enhance the room’s usability and ensure the technology operates consistently.
Professional installation services can take this to the next level by seamlessly integrating tracking systems, networking, and audio equipment. This reduces issues like tracking interference, network delays, and hardware malfunctions. By addressing every element – space, safety, environment, and technology – you can create a VR setup that offers both immersive experiences and reliable performance.
"A good VR setup is about more than just the tech. It’s about creating a space where you can fully immerse yourself without any distractions or safety concerns." – Toxigon [7]
For families in Northern New Jersey, One Sound Choice offers over 30 years of expertise in residential technology. Their services include enterprise-grade networking, precise sensor calibration, and ongoing support to ensure your VR gaming room remains cutting-edge and reliable. By partnering with professionals, you can transform your vision into a functional, high-performance space designed for modern VR gaming.
Ongoing maintenance and regular updates are crucial to protecting your investment and maintaining peak performance. Software updates, hardware recalibrations, and timely troubleshooting prevent issues caused by outdated equipment. To learn more about how a professionally designed VR gaming room can elevate your home entertainment, visit onesoundchoice.com.
FAQs
How do I choose between inside-out and external tracking?
Choosing between inside-out and external tracking comes down to your room size and personal preferences. Inside-out tracking relies on sensors built into the headset, making it a great choice for smaller spaces or if you want a wireless setup. On the other hand, external tracking uses sensors placed around the room, offering more precision, especially in larger areas. Think about the size of your space, the type of VR experience you’re aiming for, and whether you prefer a wired or wireless configuration to figure out which option works best for you.
What router and Wi‑Fi setup do I need for smooth wireless VR?
For a seamless wireless VR experience, opt for a Wi-Fi 6E router or access point. This ensures faster speeds, minimal lag, and less interference. To improve stability, connect your VR computer or headset using an Ethernet cable and position the router or access point in the same room as your VR setup. Assigning a dedicated band specifically for your VR devices can further boost performance.
What upgrades reduce motion sickness during longer VR sessions?
To make longer VR sessions more comfortable and reduce motion sickness, focus on setting up your VR space thoughtfully. Start by ensuring there’s enough room to move freely without bumping into obstacles. Use cable management systems to keep wires out of the way and reduce the risk of tripping. A well-fitted, stable, and ergonomic headset is also crucial for comfort. Additionally, proper lighting and a tidy, organized setup can go a long way in minimizing discomfort. These small but important tweaks can lead to a more seamless and enjoyable VR experience.